Measure
Click the Map Tools | Map Tools | Measure command or the  button or right-click and select Measure to calculate the distance and area of a highlighted section of a map. After clicking the command, click on the screen around the edge of the line or area you wish to measure. The Segment length, Total length, Total perimeter, and Enclosed area are displayed in the Measure dialog in map units. Double-click or press ENTER on the keyboard to finish the current measurement. The dialog will stay open until you click the
 ![]() button in the top right of the dialog or click on the dialog and press ESC on the keyboard.
button in the top right of the dialog or click on the dialog and press ESC on the keyboard.
Units are in map units. Use the Options command to change the units. The length and area are calculated only using the X and Y coordinates (planar length and area). The Z values are not used to calculate the length or area of the measured polyline or polygon. When using latitude and longitude, the lengths and areas are calculated using a Cartesian coordinate system, not using a great circle or the curvature of the earth.
|
|
|
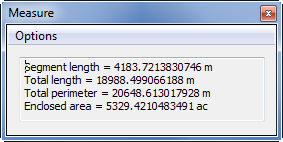
The area and length are displayed in the Measure dialog. |
Drawing Points
Click the left mouse button to add points to the measuring object. If the CTRL key is pressed while clicking points, the points are constrained to 45-degree angles. Double-click the left mouse button or press ENTER on the keyboard to end adding points to the measuring object. Press ESC to exit measure mode. Points can be added inside or outside of the selected map layer and the map frame.
Removing Points
Right-click to remove the last drawn point. This can be done repeatedly.
Panning and Zooming
Click and drag the scroll bars to move the view up or down while in measure mode. Alternatively, hold down the wheel button straight down, and the cursor will turn to a closed hand. When the cursor is a ![]() , drag the mouse to pan the plot window. Be sure to click straight down with the scroll wheel.
, drag the mouse to pan the plot window. Be sure to click straight down with the scroll wheel.
You can use a wheel mouse to zoom in and out while in measure mode. Rotate the wheel forward to zoom in, or rotate the wheel backward to zoom out.
3D Maps, Tilt, and Perspective
A 2D non-tilted, non-perspective must be selected. If a 3D surface map layer or 3D wireframe map layer is included, the Measure command will be unavailable. Select the 3D surface map layer or 3D wireframe map layer and press DELETE on the keyboard or click the Break Apart command.
When all 3D maps have been removed, click on the Map in the Contents window to select it. Click on the View tab in the Properties window. Set the Projection to Orthographic and the Tilt (degrees) to 90.
Measurements
The Measure dialog displays four measurements derived from the drawn polygon or polyline:
- The Segment length is the length of the last segment drawn. To indicate a new segment, click the left mouse button. The Segment length starts again at zero and increases in any direction as the mouse is moved.
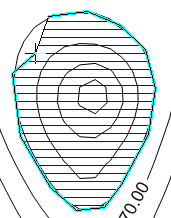
- The Total length is the length of all of the individual line segments. Each Segment length is a positive value and added together. This is the sum length of all cyan colored lines.
- The Total perimeter is similar to the Total length, except it includes the last unfinished segment that would return the digitized area to the original point. In the diagram below, this is the light black line.
- The Enclosed area is the area of the shaded region being displayed. If a polygon intersects itself, the area from all sub-polygons will be added together.
|
|
|
The cyan lines are included in the Total length. The Total perimeter includes all cyan lines and the black line. The Enclosed area is represented by the area filled by blue horizontal lines. |
Copying Measurements
To copy the information from the Measure dialog, right-click in the dialog and select Select All. Right-click again and select Copy . The information can then be pasted into the plot window or another program.
Measure Options
Click the Options menu in the Measure dialog to modify how the measurements are displayed and to save or export the measurement geometry.
Numeric Format
The numeric format for the length and area values can be changed by clicking the Options | Numeric Format command. The Label Format dialog opens. Set the desired format and click OK and the formats in the Measure dialog update.
Units
The units displayed in the Measure dialog are in Map units. By default, the Map units are controlled by the Coordinate System tab in the Properties window for the Map object. To change the units, click the Options | Units command in the Measure dialog. In the Units dialog, select the appropriate Linear Units and Area Units. Click OK to return to the Measure dialog.
|
|
|
Select the Linear Units and Area Units for the measurements. |
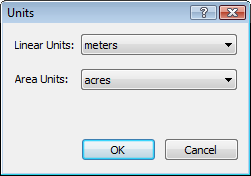
The Linear Units are used for the Segment length, Total length, and Total perimeter. The Area Units are used for the Enclosed area.
Note that the units cannot be changed if the map is not referenced or if the Map coordinate system is set to display latitude and longitude. Set the layer source coordinate system and the map target coordinate system and the units can be changed.
The default Linear Units and Area Units can be changed with the mtDistUnit and mtAreaUnitDefault Settings. The following table lists the default setting value for the various options.
|
Linear Units |
mtDistUnit Value |
Area Units |
mtAreaUnit Value |
|
Millimeters |
0 |
Square millimeters |
0 |
|
Centimeters |
1 |
Square centimeters |
1 |
|
Meters |
2 |
Square meters |
2 |
|
Kilometers |
3 |
Square kilometers |
3 |
|
Inches |
4 |
Square inches |
4 |
|
Feet |
5 |
Square feet |
5 |
|
Survey feet |
6 |
Square survey feet |
6 |
|
Yards |
7 |
Square yards |
7 |
|
Miles |
8 |
Square miles |
8 |
|
Nautical miles |
9 |
Square nautical miles |
9 |
|
Chains |
10 |
Square chains |
10 |
|
Rods |
11 |
Square rods |
11 |
|
Links |
12 |
Square links |
12 |
|
Fathoms |
13 |
Square fathoms |
13 |
|
Hectares |
14 |
||
|
Acres |
15 |
Save Geometry to Base Layer
Click Options | Save Geometry to Base Layer in the Measure dialog to add the polyline or polygon used for measurement to a new or existing base layer. After clicking Save Geometry to Base Layer the Destination Layer dialog is displayed.
|
|
|
Select or create a destination layer for the measure geometry. |
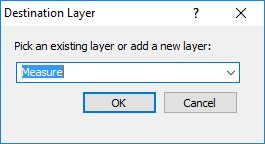
By default, measurement geometries are saved to the Measure base layer. If the Measure base layer does not exist, one will be created. Click the ![]() to select a layer from the list if you wish to add the geometry to an existing base layer. Type a layer name in the Destination Layer dialog to create a new base layer for the measurement geometry.
to select a layer from the list if you wish to add the geometry to an existing base layer. Type a layer name in the Destination Layer dialog to create a new base layer for the measurement geometry.
Export Geometry
Click Options | Export Geometry in the Measure dialog to export the measurement geometry to a vector file. After clicking the Export Geometry command, the Export dialog is displayed. Note that only vector file types will be displayed in the Save as type list.
Other Methods to View Area and Length
Other methods of displaying length and area are to digitize an object and create a base map from the object or add an empty base map to an existing map and draw the objects in the base map. Both of these methods are described below. The perimeter and area are displayed on the Info page in the Properties window when the object is selected.
Digitize
To digitize an object, click on an existing map layer and click the Digitize command. Click on the screen in the desired locations. The coordinates appear in the Digitized Coordinates window. Save the coordinates to a .BLN file by clicking the File | Save As command in the window. A new base map can be created by clicking the Home | New Map | Base command or the Home | Add to Map | Layer | Base command, if an existing map is selected. Once the base layer exists, click on any object in the base layer to see the length and area information on the Info tab in the Properties window.
Drawing Objects on an Existing Map
To draw objects on an existing map, click on the map to select it. Click the Home | Add to Map | Layer | Empty Base command to add an empty base map layer to the map. Click on the Base object in the Contents window to select the new empty base layer. Use the Features tab commands to add polylines, spline polylines, polygons, rectangles, rounded rectangles, or ellipses to the base map layer. Click on any object in the base layer to see the length and area information on the Info tab in the Properties window.