Specifying Contour Levels
The Contour Levels dialog is used to assign regularly spaced contour levels or color zones (i.e. 3D wireframe). For example, assume the smallest Z value is defined as 50, the largest Z value is 100, and the interval between contours or zones is 10. In this case, contour lines or color zones are drawn at Z levels of 50, 60, 70, 80, 90, and 100. If the range of grid Z values goes beyond the defined minimum and maximum contour levels, the contours or color zones outside the levels are not drawn.
You can manually change the Z value of any single contour level by double-clicking on the level value on the Levels page in the Levels for Map dialog when the Level method is set to Advanced.
Contour Levels Dialog
Click the Level button in the Levels for Map dialog to open the Contour Levels dialog.
|
|
|
Customize contour levels in the Contour Levels dialog. |
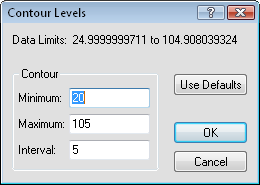
Data Limits
The actual Data Limits of the grid file are listed for reference. These values cannot be changed.
Minimum, Maximum, Interval Contour Values
Enter values for the Minimum and Maximum contours, and the Interval value that defines the spacing in Z units between adjacent contour lines.
Surfer uses the Interval, the Minimum contour value, and the Maximum contour value to determine how many contour lines are created on the map. Surfer will issue a warning message if the number of contour lines increases above 5000. Click OK in the warning message and alter the Interval, the Minimum contour value, or the Maximum contour value so that the total number of lines is less than 5000.
Use Defaults
The Use Defaults button can be used to calculate a reasonable set of parameters based on the range of Z values within the grid.
OK and Cancel buttons
Click OK and the contour level list is updated with the selections made in the Contourgroup. Click Cancelto close the dialog with making any changes.
To Create Contour Levels at Regular Intervals
The easiest way to create regular contour intervals is to use the simple level method:
- Click on a contour map to select it.
- In the Properties window, click on the Levels tab.
- Set the Level method to Simple.
- Set the values for the Minimum contour and Maximum contour.
- Set the Contour interval value that defines the spacing in Z units between adjacent contour lines.
Regularly spaced contours are automatically created.
Using advanced options allows the possibility of controlling additional features for each contour line separately. Use these steps for advanced contour lines:
- Click on a contour map to select it.
- In the Properties window, click on the Levels tab.
- Set the Level method to Advanced.
- Click the Edit Levelsbutton next toContour levelsto open the advanced optionsLevels for Mapdialog.
- To assign evenly spaced contour levels, click the Level button and the Contour Levels dialog is displayed.
- Set the values for the Minimum and Maximum contours.
- Set the Interval value that defines the spacing in Z units between adjacent contour lines.
- The Use Defaults button can be used to calculate a reasonable set of parameters based on the range of Z values within the grid.
- Click OK and the contour level list is updated.
- Click OK in the dialog to update the map.