Introduction to Map Layers
A map layer is a single map type contained in a larger map object. The map layer may be a contour layer, a post layer, a base layer, or any other layer type that Surfer can create. The larger map object contains all of the individual map layers and axes used to create the entire map. Map layers can be created as separate maps or added to a single map object.
It is possible to combine several maps created from related data to create one map object with multiple map layers. You can add any combination and number of contour, base, post, color relief, grid values, point cloud, drillhole, vector, watershed, viewshed, or 3D surface layers to a single map. However, a map can contain only one 3D wireframe layer, and the wireframe cannot be combined with 3D surface, color relief or base(raster) layers.
There are multiple ways to overlay map layers in Surfer. If you have multiple maps and wish to move only one layer, you can drag a map layer from one map object to another map object in the Contents window. If you wish to combine all the layers from multiple maps, you can select all of the maps and use the Map Tools | Map Tools | Overlay Maps command. This moves all of the map layers to a single map object. If you have already created a map and need to add map layers to it, you can select the map and use one of the Home | Add to Map | Layer commands to add a map layer to the existing map. Grid-based map layers can be changed to other layer types by selecting the object in the Contents window and using the Map Tools | Layer Tools | Convert Layer command.
|
|
|
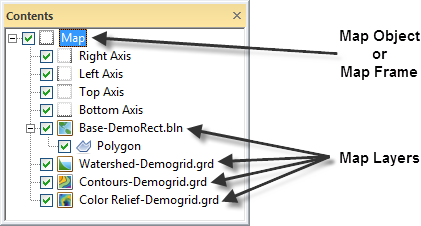
This one map object contains four map layers. There is a base layer, watershed layer, contour layer, and a color relief layer. |
Using Map Layers
When you use map layers, the layers use a single set of X, Y, and Z axes and the maps are positioned according to the map object coordinate system. If two or more maps use the same limits, they will overlay on top of one another. If maps cover adjacent areas, adding a map layer places them in the correct position relative to one another and creates a single set of axes that span the entire range. Layered maps become a single object and are moved and scaled as a single entity.
Consider a contour map and a base map that displays the outline of a lake on the contour map. The limits of the base map are the X, Y extents of the lake and are not the same as the contour map limits. If you create both the base map and the contour map in a single plot window as separate maps by using the Home | New Map commands for both maps, they do not overlay correctly because the maps have different scaling. In addition, each map uses a different set of X, Y axes. The two maps can be overlaid to correctly position the lake on the contour map by dragging the base map layer to the other map object that has the contour layer. The result will be a map object with a base map layer and contour map layer. Alternatively, if you create the contour map and then added a base map layer with the Home | Add to Map | Layer | Base command, the two maps are automatically scaled and combined into a single map using a single set of axes. The lake is correctly positioned on the contour map.
Sharing Data Between Layers
Surfer maintains a list of files currently being used along with the data that is shared from those files among the various layers. Grids, images and data files are recognized as being open in the background, thus making opening and using file information quicker. The Open dialogs for grids, images, and data files will have their respective Open Grid, Open images, Open worksheet field that shows the list of open files that can be shared.
Shared Files
Surfer tracks the files being used by maintaining a list of opened files for new maps and the files used in saved maps. The file(s) used to build maps are shown in a compiled list in the Open Grids field of the Open Grid dialog. The only exception is that vector data between base layers will not be shown.
Layers and 3D Wireframes
When you layer a contour, post, or base map on a 3D wireframe, the maps are draped over the wireframe. The wireframe is drawn in the usual fashion but the base, vector, or contour maps are "molded" over the top of the wireframe lines. Hidden lines are not removed from maps layered on wireframes. For example, contour lines are not hidden when the contour map lies over a wireframe.
Layers and 3D Surfaces
When you layer maps on top of 3D surface maps, hidden lines are removed and the maps are "molded" on the surface. Surface maps and images, vector files, and even other surface maps can be overlaid onto a single map object. The Overlays page in the surface properties dialog contains options for handling color in these cases.
Layer Exceptions
The Map Tools | Add to Map | Layer commands add a map layer to the selected map. Most combinations of map types can be layered. The exceptions are combining a 3D wireframe and 3D surface map, adding a raster map layer or point cloud to a wireframe, and adding multiple wireframe layers. Raster maps include color relief maps, surfaces, and base maps containing an image. The options under the Add command change to fit the existing map. For example, if a 3D wireframe map is selected, the Map Tools | Add to Map | Layer | 3D Surface command is grayed out.
Method 1: Adding a Map Layer to an Existing Map Frame
- Create a new map with a Home | New Map command. For example, you can choose Home | New Map | Contour to create a contour map.
- Select the map and click the Map Tools | Add to Map | Layer command to add a map layer. Select the map layer type to add to your existing map. For example, select the contour map and use the Map Tools | Add to Map | Post to add a post map layer to the contour map.
- The maps are combined in the correct position based on their coordinates and limits. For example, in the Contents window, you will see one map object with a contour map layer and a post map layer.
Method 2: Overlaying Two Existing Maps
- Create a new map with a Home | New Map command. For example, you can choose Home | New Map | Contour to create a contour map.
- Create a second map with the Home | New Map command. You could create a post map with the Home | New Map | Post | Post command.
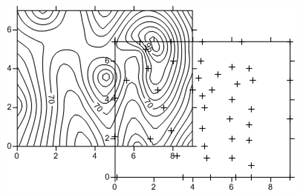
- Note that each map has an independent set of axes.
- Click Home | Selection | Select All to select both the contour and post maps.
- Click Map Tools | Map Tools | Overlay Maps. The two maps are combined onto a single map object with a single set of axes. The empty map object is automatically deleted.
This method works well when you have multiple map layers that you want to combine.
Method 3: Combining Two Existing Maps in the Contents Window
If two maps already exist, you can move (or overlay) a map layer from one map frame into the other map frame by dragging and dropping in the Contents window.
- Create a new map with a Home | New Map command. For example, you can choose Home | New Map | Contour to create a contour map.
- Create a second map with the Home | New Map command. You could create a post map with the Home | New Map | Post | Post command.
- Note that each map has an independent set of axes.
- Select the post map layer in the Contents window and drag it to the contour map object. To do this, left-click and hold the left mouse button while you drag the map layer to a new map frame. When the cursor changes to a horizontal arrow, release the left mouse button and the map layer is added to the contour map's map frame. The post map will now be overlaid on the contour map. An empty map frame may remain after removing the last map layer from the map object, depending on your options.
- If an empty map frame exists, select the empty map frame and press DELETE on the keyboard to remove the empty map frame. The end result is a single map object with two map layers: a post map layer and a contour map layer. Additional map layers can be added with the Map Tools | Add to Map commands.
|
|
|
|
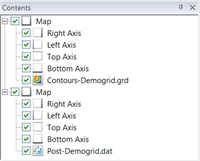
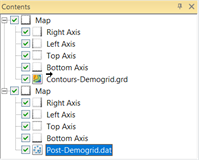
The contour map layer and the post map layer are displayed in separate map objects in the Contents window and the plot window. |
|
|
|
|
|
|
First left-click and select the post map layer (left), then drag the post map layer to the other map object. When the cursor is a horizontal arrow (middle), release the mouse button to drop the map layer in the new location (right). |
||
|
|
|
|
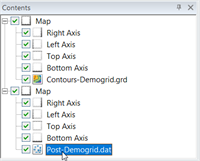
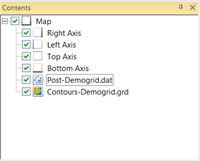
The result of this method is one Map object with two map layers. |
|
Layer Map Limits
If a map layer is added to a map frame and the map layer exceeds the current map limits, a Surfer warning message will be displayed allowing you to adjust the map limits to include all layers. Select Yes to adjust the map to include all layers. Select No to leave the current map limits.
Editing a Map Layer
To edit individual layers in a multi-layer map, select the map layer (i.e. Contours) in the plot window or Contents window and use the Properties window to edit the properties. Make the desired changes in the map layer properties, and the map layer is redrawn with the specified changes.
Hiding a Map Layer
After adding map layers, it is possible to hide one or more of the layers. To temporarily hide a map layer, uncheck the visibility box next to the map layer name (i.e. Contours) in the Contents window. The map is redrawn without the selected overlay. To make the overlay visible again, recheck the visibility box. Note that if a surface is made invisible, the overlays are also made invisible.
Removing a Map Layer
Select the map layer and use the Break Apart Layer command to remove a map layer from a map object. Alternatively, right-click on the map layer and select Break Apart Layer.
Deleting a Map Layer
To delete a map layer from a map frame, select the map layer in the Contents window and press the DELETE key on the keyboard. Alternatively, you can select the map layer and use the Home | Clipboard | Delete command, or right-click the map layer and select Delete.