Grid Point Cloud
Click Point Cloud | Features | Create Grid or the  button to create a grid file from the point cloud layer. The Grid Point Cloud dialog is displayed when the Create Grid command is clicked.
The Create Grid command uses a binning algorithm to create a grid file from the point cloud data. Each grid node is at the center of a grid cell, and all points within the cell are aggregated by the selected Aggregation method to compute the grid node value. The binning algorithm does not extrapolate beyond the convex hull of the data, and any grid nodes with no points within their cell are assigned the NoData value.
If you wish to create a grid with one of the gridding methods, export the point cloud layer to an LAS/LAZ file and use the newly created file with the Grid Data command.
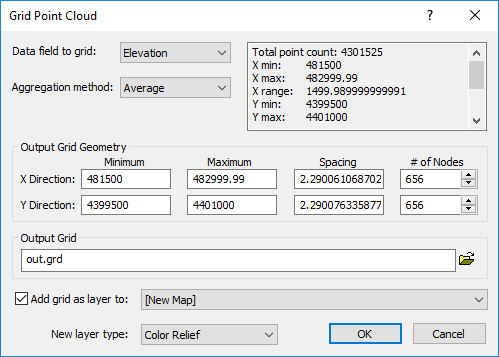
Grid Point Cloud Dialog
The Grid Point Cloud dialog is displayed when the Point Cloud | Features | Create Grid command is clicked. Specify the data field, aggregation method, output grid geometry and file name in the Grid Point Cloud dialog.
|
|
|
Create a grid file from a point cloud layer with Grid Point Cloud . |
Data Field to Grid
A grid can be created from the elevation, intensity, return number, or classification value. Select the field Elevation, Intensity, Return number, or Classification in the Data field to grid list.
Aggregation Method
The Aggregation method specifies how the grid node values are calculated from the points in the grid cell.
-
Average assigns the average value of the points within the cell.
-
Minimum assigns the minimum value from the points within the cell.
-
Maximum assigns the maximum value from the points within the cell.
-
Nearest assigns the value from the point nearest the grid node.
-
IDW assigns the inverse distance squared weighted average value of the points within the cell.
Select the desired method from the Aggregation method list.
Data Statistics
The data statistics section shows the number of points and the spatial extents of the point cloud layer.
Output Grid Geometry
The Output Grid Geometry section defines the grid limits and grid density. By default, the Output Grid Geometry settings are spaced to include an average of ten points per grid node cell.
Minimum and Maximum X and Y Coordinate (Grid Limits)
Grid limits are the minimum and maximum X and Y coordinates for the grid. Surfer computes the minimum and maximum X and Y values from the point cloud layer. These values are used as the default minimum and maximum coordinates for the grid.
Grid limits define the X and Y extent of contour maps, color relief maps, 3D surfaces, etc. created from grid files. When creating a grid file, you can set the grid limits to the X and Y extents you want to use for your map. Once a grid file is created, you cannot produce a grid-based map larger than the extent of the grid file. If you find you need larger grid limits, you must regrid the data. You can, however, read in a subset of the grid file to produce a map smaller than the extent of the grid file.
Spacing and # of Nodes (Grid Density)
Grid density is usually defined by the number of columns and rows in the grid, and is a measure of the number of grid nodes in the grid. The # of Nodes in the X Direction is the number of grid columns, and the # of Nodes in the Y Direction is the number of grid rows. By defining the grid limits and the number of rows and columns, the Spacing values are automatically determined as the distance in data units between adjacent rows and adjacent columns.
Output Grid
Choose a path and file name for the grid file in the Output Grid section. You can type a path and file name, or click the  button to browse to a new path and enter a file name in the Save Grid As dialog. By default the grid file name is based on the first file in the point cloud metadata.
Add Grid as Layer
Check the Add grid as layer to check box to automatically add the created grid to a new or existing map. Select [New Map] in the Add grid as layer to field to create a new map. Click the current selection and select an existing map to add a new layer to the map. Select the layer type by clicking the current selection in the New layer type field and selecting the desired layer type from the list.