Base Map Labels Properties
After assigning attributes to polylines, polygons, and symbols, attribute labels can be added. The attribute, position, and font properties can also be specified on the Labels page in the base map properties. Attributes for rectangles, rounded rectangles, and ellipses do not appear as labels. To add labels from attributes to a base map, click once on the base map layer to select it. In the Properties window, click on the Labels tab.
|
|
|
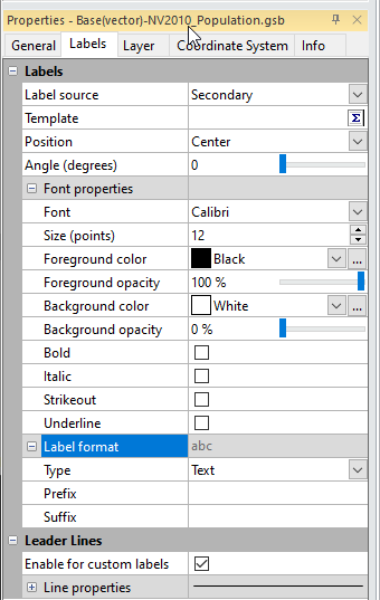
Change base map label properties on the Labels page in the Properties window. |
Labels Properties
The properties in the Labels section control the content, position, and appearance of the base (vector) layer labels.
Label Source
The Label source determines whether or not labels are displayed and which attribute should be displayed. To change the Label source, click on the existing option and select the desired option from the list. Available options are [None], [Template], and then a list of all attribute names in the file. To display no labels, set the Label source to [None] . To display a single attribute, select the attribute name from the list. To display multiple attribute names or an attribute name and additional text, select [Template] . Then, set the Template option to the desired text and attributes.
Template
The Template option allows multiple attributes and text to be displayed for the label. Attribute names must be listed exactly as they appear in the Label source list. Attribute names must have square brackets around them, such as [Attribute Name] in order to be recognized. Attribute names are case sensitive, so there is a difference between [name] and [Name]. Any number of attributes may be added to the Template section.
The square brackets are mandatory. Math text options (such as \up50 ) must appear outside of the square brackets. If the font or font properties are changed for the attribute, highlight the entire text including the square brackets before changing the properties in the Text Editor.
Click the ![]() button to open the Text Editor where multiple lines of text can be created. Attribute names must appear in the Text Editor with square brackets around the name.
button to open the Text Editor where multiple lines of text can be created. Attribute names must appear in the Text Editor with square brackets around the name.
Position
The Position controls the offset of the label from the object center. To change the position, click on the existing position and select the new position in the list. Specify Center, Left, Right, Above, Below, or User defined. User defined allows you to specify the exact offset (in page units) in the X offset and Y offset boxes. The posted labels are all placed in the same position relative to the associated object. Positive values in the X offset shift the label position toward the positive direction (to the right for normal axes, to the left for reversed axes). Negative values in the X offset shift the label position toward the negative direction (to the left for normal axes, to the right for reversed axes). Positive values in the Y offset shift the label position toward the positive direction (upward for normal axes, downward for reversed axes). Negative values in the Y offset shift the label position toward the negative direction (downward for normal axes, upward for reversed axes). The X offset and Y offset values are numbers between -4 and +4 inches (-10.16 and +10.16 centimeters). To change the X offset and Y offset values, highlight the existing value and type a new value or click the ![]() buttons to increase or decrease the offset.
buttons to increase or decrease the offset.
Individual label and leader line positions can also be adjusted manually using the Edit Layer Labels and Move Anchor commands.
Angle (degrees)
The Angle (degrees) box specifies the angle in degrees to rotate the labels. Positive angles rotate the labels counterclockwise. To change the Angle (degrees), highlight the existing angle value. Type a new value or click and drag the  to the desired angle position.
Font
Click the ![]() next to Font Properties to display the Font Properties section. The font properties are applied to all labels.
next to Font Properties to display the Font Properties section. The font properties are applied to all labels.
Format
Click the ![]() next to Label Format to display the Label Format section. The label format properties are applied to all labels. If the values in the Label source attribute are not numeric, the label will be displayed as unformatted text.
next to Label Format to display the Label Format section. The label format properties are applied to all labels. If the values in the Label source attribute are not numeric, the label will be displayed as unformatted text.
Leader Lines
The Leader Lines section is used when the base(vector) layer has labels that are moved to a new location. The leader line is drawn from the symbol center or object centroid to the new label location.
Enable for Custom Labels
Check the Enable for custom labels option to display leader lines when labels are moved to a new location with the Edit Layer Labels command or the Disperse Labels command. The leader line will display a line from the original label location to the dragged location.
Leader Line Properties
Click the ![]() next to Line Properties displays the Line Properties options, allowing you to specify the line Style, Color, Opacity, and Width for leader lines.
next to Line Properties displays the Line Properties options, allowing you to specify the line Style, Color, Opacity, and Width for leader lines.
Examples
The following examples demonstrate adding labels to base layer objects.
Attribute Labels
Create a base map from a .SHP file. When the .SHP file is loaded, the attributes are also imported. To label all of the polygons with the Primary ID:
- Click on the Base object in the Contents window to select it.
- In the Properties window, click on the Labels tab.
- Change the Label source to Primary ID. The Primary ID will appear next to all polylines, polygons, and symbols in the .SHP file.
Template Labels
Create a base map from a file that contains attributes. After the file is loaded, the attributes appear for each of the individual polylines, polygons, and symbols. To create complex labels for each object:
- Click on the Base object in the Contents window to select it.
- In the Properties window, click on the Labels tab.
- Change the Label source to [Template].
- Next to Template, type the desired attribute names, surrounded by square brackets. For instance, if you wanted to display the name of a property and the owner's name, your Template may look like:
[Name] - [Owner]
- To create multiple lines, click the
 button.
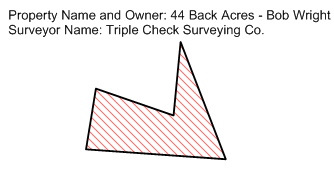
 - In the Text Editor, type the attribute names, surrounded by square brackets. Add any additional text. To add a new line, press ENTER on the keyboard. You might have:
Property Name and Owner: [Name] - [Owner]
Surveyor Name: [Surveyor]
- When all edits are complete, click OK to close the Text Editor. The labels appear on the screen.
|
|
|
The label appears in the desired location, substituting the attribute value for the attribute names in square brackets. |