Labels Properties
When posting data points on a post map or classed post map, you can associate text from the worksheet with each posted symbol. The position, font, and numeric format can also be specified on the Labels page in the post properties and classed post properties.
To add labels to a post map or classed post map, click once on the post map to select it. In the Properties window, click on the Labels tab.
|
|
|
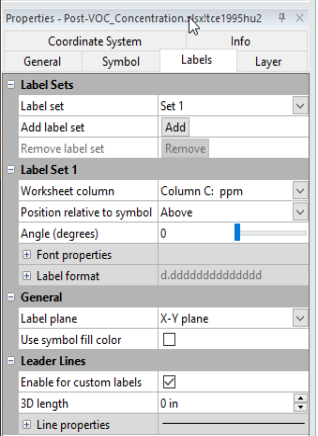
Change post map or classed post map label properties on the Labels page in the Properties window. |
Label Sets
The Label Sets section controls which label is being controlled by the Label Set # section. Multiple labels can be displayed by changing the Label Sets settings. Click the ![]() next to Label Sets to open the Label Sets section.
next to Label Sets to open the Label Sets section.
Label Set
The Label set displays the name of the label that is currently being changed. Click on the set name (Set 1, for instance) to select a different set name from the list. If only Set 1 is displayed in the list, only a single label set is currently created. All of the Label Set # properties apply to only the selected Label set.
Add Label Set
The Add label set option allows new labels to be added. Click the Add button to create a new Label set. The Label set option automatically changes to the new set. If this is the second label to be added, a Set 2 is added to the Label set list. If this is the third label to be added, a Set 3 is added to the Label set list, and so on.
Remove Label Set
The Remove label set option deletes a label from the Label set list. To delete a label, first set the Label set to the label that should be deleted. Then, click the Remove button next to Remove label set to delete the label. All properties of the label set are removed.
Label Set #
The Label Set # section controls the worksheet column, position, angle, font, and label properties for the selected Label set . Before making any changes in this section, change the Label set option to the desired label. The Label Set # changes to display the name of the Label set . For instance, if Label set is set to Set 3 , the Label Set # section name changes to Label Set 3.
Worksheet Column
Select the worksheet column containing the values or text from which you wish the Label set to display near the posted points in the Worksheet column list. Click on the existing worksheet column or None to change to a new worksheet column. Labels may be the original data values for the data points, or may be other identifying text such as well names or sample numbers. Labels can use math text instructions to define custom character formatting. Different worksheet columns can be selected for each Label set.
Position Relative to Symbol
The Position relative to symbol controls the offset of the selected label from the symbol center. To change the position, first change the Label set to the desired label. Then, click on the existing position in the Position relative to symbol option and select the new position from the list. Available options are Center, Left, Right, Above, Below, and User defined. User defined allows you to specify the exact offset (in page units) in the X offset and Y offset boxes. The posted labels are all placed in the same position relative to the associated symbol.
Positive offset values move the labels in the positive axis direction. For reversed axes, this means that the label is moved in the opposite direction of the Position relative to symbol specified. For instance, if the bottom axis is reversed, setting the Position relative to symbol to Left will move the label to the right of the symbol (in the negative direction). Setting the Position relative to symbol to User defined and setting the X offset to 0.25 inches will move the label 0.25 inches in the negative axis direction.
X Offset and Y Offset
When the Position relative to symbol option is set to User defined, the X offset and Y offset options are available. The X offset controls the location of the label in the left-right direction. Positive values in the X offset shift the label position toward the positive direction (to the right of the symbol for normal axes, to the left for reversed axes). Negative values in the X offset shift the label position toward the negative direction (to the left of the symbol for normal axes, to the right for reversed axes). A value of zero places the label directly in the center of the symbol.
The Y offset controls the placement of the label in the up-down direction. Positive values in the Y offset shift the label position toward the positive direction (upward for normal axes, downward for reversed axes). Negative values in the Y offset shift the label position toward the negative direction (downward for normal axes, upward for reversed axes). A value of zero places the label directly in the center of the symbol.
The X offset and Y offset values are numbers between -4 and +4 inches (-10.16 and +10.16 centimeters). To change the value, highlight the existing value and type a new value. Alternatively, click the ![]() to increase or decrease the value.
to increase or decrease the value.
Angle (degrees)
The Angle (degrees) box specifies the angle in degrees to rotate the selected label set. Positive angles rotate the labels counterclockwise. To change the Angle (degrees), highlight the existing angle value. Type a new value or click and drag the  to the desired angle position.
Font
Click the ![]() next to Font Properties to display the Font Properties section. The font properties are applied to all labels in this label set. Different label sets can contain different font properties.
next to Font Properties to display the Font Properties section. The font properties are applied to all labels in this label set. Different label sets can contain different font properties.
Format
Click the ![]() next to Label Format to display the Label Format section. The numeric format is applied to all numbers read from the specified label column in this label set. Different label sets can contain different label formatting.
next to Label Format to display the Label Format section. The numeric format is applied to all numbers read from the specified label column in this label set. Different label sets can contain different label formatting.
When the Type is set to Date/time, if Invalid date text is displayed instead of the actual date/time format, the value for the label is outside the defined date/time range.
General
The General section controls the label plane for all label sets. In addition, all label sets can be set to use the symbol fill color for the label font color.
Label Plane
The Label plane list specifies the coordinate plane that contains the label. To change the Label plane, click on the existing plane and choose the new plane from the list. Available options are X-Y plane and Screen. If X-Y plane is selected, labels are oriented parallel to the X-Y plane of the map. As the map is tilted in 3D, the labels tilt as well. This can make it hard to read the labels at shallow tilt angles since the labels are viewed on edge. In this case, it may be better to orient the labels in the Screen plane. Screen oriented labels are always displayed perpendicular to the viewer’s line of sight, no matter how the map is tilted or rotated. All labels from all label sets use the same Label plane.
Use Symbol Fill Color
The Use symbol fill color option controls whether the color of the symbol is used for all label sets. When the Use symbol fill color option is checked, all label sets for a point use the symbol color for the text color instead of the Font Properties section Foreground color option. When the symbol color changes, the label color automatically changes, as well. When the Use symbol fill color option is unchecked, the Font Properties section Foreground color option controls the label color. Each label set can then be a separate color.
Leader Lines
The Leader Lines section is used when the post map or classed post map has labels that are offset in the Z direction or when a label is moved to a new location. The leader line is drawn from the symbol center to the new label location.
Enable for Custom Labels
Check the Enable for custom labels option to display leader lines when labels are moved to a new location with the Edit Layer Labels command or the Disperse Labels command. The leader line will display a line from the original label location to the dragged location.
|
|
|
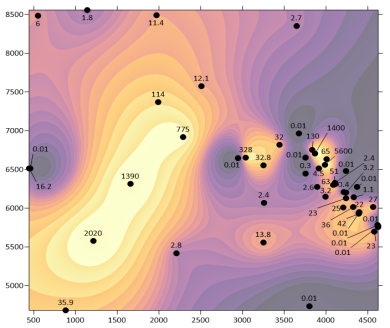
This map has a color relief map layer and a post map layer. The post points are labeled. The labels have been moved with the Layer Labels command. Leader lines go from the data point to the posted label. |
3D Length
The 3D length defines the distance above the map that the points are posted when the post map is tilted at a value other than 90 degrees. The 3D length box specifies how long the label lines are and how far above the wireframe or tilted post map the labels are drawn. 3D Leader Lines are not drawn on post maps overlaid on a 3D surface map. The 3D length is a value between 0 and 10 inches (0 and 25.4 centimeters). To change the length, highlight the existing value and type a new value. Press ENTER on the keyboard or click anywhere else in the Properties window to make the change. Alternatively, click the ![]() buttons to increase or decrease the line length.
buttons to increase or decrease the line length.
|
|
|
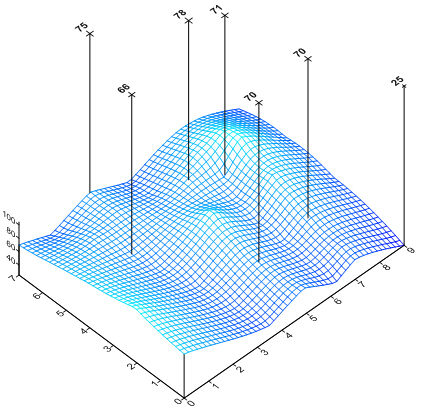
This map has a 3D wireframe layer and a post map layer. The post points are labeled and have 3D leader lines from the data point to the post label. |
Leader Line Properties
Click the ![]() next to Line Properties displays the Line Properties options, allowing you to specify the line Style, Color, Opacity, and Width for leader lines.
next to Line Properties displays the Line Properties options, allowing you to specify the line Style, Color, Opacity, and Width for leader lines.
Creating a Post Map with Multiple Labels
Post maps and classed post maps can have multiple labels from different columns displayed on the map. To create a single map with multiple labels:
-
Click the Home | New Map | Post command to create a new post map.
-
Select the data file in the Open Data dialog and click Open.
-
Click on the Post layer to select it in the Contents window.
-
In the Properties window, click on the Labels tab.
-
With the Label set as Set 1,
-
In the Label Set 1 section, set the Worksheet column for the first label.
-
Change the Position relative to symbol to the desired position.
-
Set any Font Properties or Label Format options.
-
-
Click the Add button next to the Add label set option.
-
With the Label set as Set 2,
-
In the Label Set 2 section, set the Worksheet column for the second label.
-
Change the Position relative to symbol to the desired position.
-
Set any Font Properties or Label Format options.
-
See Also
Updating Post Maps and Classed Post Maps