Classed Post Layer Classes Properties
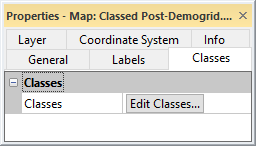
The classed post map Classes page allows you to open the dialog to set classed post map classes. To edit classed post map classes, click once on the classed post map to select it. In the Properties window, click on the Classes tab. Click the Edit Classes button.
|
|
|
The Classes page provides access to the Classes for Map dialog. |
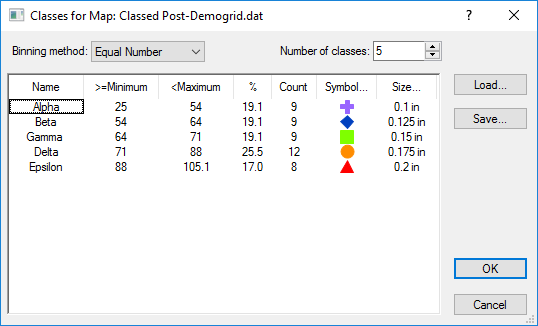
In the Classes for Map dialog, define the classes used to group the data values. Each class is represented by a unique symbol in the classed post map.
|
|
The classed post Classes for Map dialog allows you to define classes that group data values. Hover over any portion of the dialog for additional information. |
Binning Method
The Binning method specifies the method used to calculate the limits of the classes. There are three options available: Equal Number, Equal Intervals, and User Defined. To change the Binning method, click on the existing option and select the desired option from the list.
-
Equal Number assigns the class ranges such that approximately equal numbers of points are included in each class. Normally in this case, the interval of each class is different.
-
Equal Intervals assigns the class ranges so the interval between the >= Minimum value and the <Maximum value is equal for each class. Normally in this case, a different number of points is assigned to each class.
-
User Defined allows you to set the >=Minimum value and the <Maximum value for each class individually. This allows you to specify your own ranges for the classes. To change the >=Minimum or <Maximum value, double-click the values in the class list.
Number of Classes
The Number of classes value is used to indicate how many classes or groupings there will be on the map. When you change the Number of classes value, the class list box is automatically updated to reflect the change. Surfer allows the creation of up to 200 classes. To change the number of classes, click the ![]() button to increase or decrease the number of classes or highlight the existing number and type in a new value from 1 to 200 classes.
button to increase or decrease the number of classes or highlight the existing number and type in a new value from 1 to 200 classes.
Insert Class
When the Binning method is set to User Defined, the Insert Class option is available. To add a new class, click anywhere in the class list on the row where the new bin should be created. Click the Insert Class button or right-click on the selected row and select Insert Class. The new class is added. The new class automatically has the >=Minimum and <Maximum values set to the selected row's minimum value. When a new bin is created, it automatically uses the symbol properties and size for the previously selected bin.
For example: Suppose you have three bins 0-1, 1-2, and 2-3 and you want to create a new bin with values between 0.5 and 1, you would click anywhere on the second bin's (1-2) row. The new class will be set with 1 for the >=Minimum and <Maximum values. Double-click on the >=Minimum value. In the Class Limit dialog, type 0.5 and click OK. The new bin will be updated to show 0.5 to 1. The new class will use the same symbol as the 1-2 class.
Delete Class
When the Binning method is set to User Defined, the Delete Class option is available. Click on the class that should be deleted and click the Delete Class button or right-click on the selected row and select Delete Class . The class is removed from the bin list.
Changing the Class Name
Specify a class name in the Classes for Map dialog to display class names in a legend. By default, classes are named Class 1, Class 2, etc. Double-click a class name in the name column to change the name. Type the desired class name in the pop-up dialog.
Changing the Bin Limits for Each Class
The class list box displays summary statistics and allows you to specify the properties for each class. Available columns are: >=Minimum, <Maximum, %, Count, Symbol, and Size. The >=Minimum and <Maximum control the limits of the class.
The >= Minimum list specifies the lower limit for each class of data. The minimum value is included in the bin. The <Maximum list specifies the upper limit for each class of data. The maximum value is not included in the bin. Double-click on any number in the >=Minimum or <Maximum column, or right-click on a row and select Minimum or Maximum to open the Class Limit dialog. Change the value for the selected class and click OK in the dialog to make the change. Bin limits are adjacent. The <Maximum value for the previous bin is automatically set to the >=Minimum value of the following bin. When one value changes, the other automatically updates.
Note, when using date/time formats for the bin minimum and maximum, the >=Minimum and the <Maximum must always be in numbers, not in date/time format.
Statistical Information about the Points in Each Class
The class list box displays summary statistics and allows you to specify the properties for each class. Available columns are: >=Minimum, <Maximum, %, Count, Symbol, and Size. The % and Count columns display statistical information about the class. The % column indicates the percentage of data points in the particular class. The Count column indicates the number of points included in each class. These values cannot be directly edited and are for informational purposes only.
Changing an Individual Class Symbol
The Symbol column displays the symbol used for each class. To change a symbol or symbol property used for a particular class, double-click the class symbol or right-click and select Symbol Properties . Make changes in the Symbol Properties dialog. To change the symbols for all classes, click the Symbol button at the top of the column.
Changing an Individual Class Size
The Size column specifies the size of the symbol. To change the size of a symbol for a particular class, double-click the Size value in the class row or right-click and select Symbol Properties. Change the value in the Symbol Properties dialog. To change the symbol size for all classes, click the Size button at the top of the column.
Changing All Class Symbols at the Same Time
Click the Symbol button to set the properties for all symbols at the same time. The Class Symbol Properties dialog opens. Change the properties in the dialog to set all symbols to the same (uniform) properties or to assign different properties according to a gradational colormap. The symbol set, symbol, fill color, and line color can be changed for all classes at the same time.
Changing All Class Symbol Sizes at the Same Time
Click the Size button to set the symbol size for all symbols at the same time. The Class Symbol Size Properties dialog opens. Set the Minimum Size and Maximum size . When the sizes are the same, all classes use the same sized symbol. When the sizes are different, each class is sized so that the first class has the Minimum Size and the last class has the Maximum Size . Consecutive classes have the same difference in sizes, so the symbols increase proportionally.
Loading a Classed Post Map Class .CLS File
Click the Load button to load an existing classed post map .CLS class file.
Saving a Classed Post Map Class .CLS File
Click the Save button to save a classed post map .CLS class file. The range minimum, range maximum, symbol set, symbol index number, color, and symbol size are saved in the .CLS file. The color is in RGBA format.
OK or Cancel
Click OK to make the changes to the classed post map. Click Cancel to close the dialog without making changes to the classed post map.
See Also
General Page - Classed Post Map