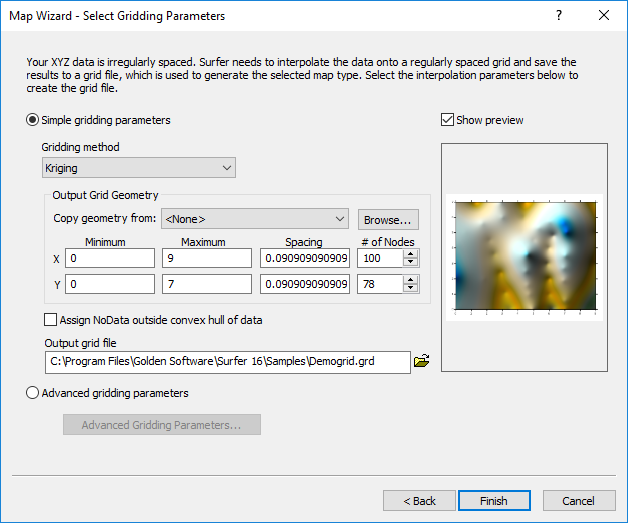
Map Wizard - Select Gridding Parameters
Click the Home | Wizard | Map Wizard command to open the Map Wizard. The third page is the Select Gridding Parameters page. Here you specify the gridding parameters for creating the grid for the grid-based layer or layers. Once you have specified the gridding parameters, click Finish to create your grid file and map.
|
|
|
Specify gridding parameters for creating a grid from the source data file. |
Simple Gridding Parameters
Select Simple gridding parameters to quickly generate a grid with the default gridding options. When Simple gridding parameters is selected, specify the Gridding method and output grid geometry.
Gridding Method
Surfer has several different gridding methods. These gridding methods define the way in which the XYZ data are interpolated when producing a grid file. Change the Gridding method by clicking the current selection and selecting the desired method from the list. Refer to the gridding methods for more information on the options.
Output Grid Geometry
The Output Grid Geometry section defines the grid limits and grid density. The Output Grid Geometry section also controls whether grid nodes outside the data are automatically assigned the NoData value. See the Grid Data topic for a grid geometry example.
Copy Geometry
The Copy geometry from option copies the grid geometry from an existing map layer or grid file. This option is useful when creating grids that will become overlaid map layers, processed with the Grid Math command, or used to calculate a volume between two surfaces. The Math and Volume commands require the input grids to have the same geometry.
To copy the geometry from an existing layer, select the layer in the Copy geometry from list. To copy the geometry from a grid file, click Browse and select the file in the Open Grid dialog. Select <None> to return the Output Grid Geometry options to their default values and to manually edit the grid geometry.
Minimum and Maximum X and Y Coordinate (Grid Limits)
Grid limits are the minimum and maximum X and Y coordinates for the grid. Surfer computes the minimum and maximum X and Y values from the XYZ data file. These values are used as the default minimum and maximum coordinates for the grid.
Grid limits define the X and Y extent of contour maps, color relief maps, vector maps, 3D wireframes, and 3D surfaces created from grid files. When creating a grid file, you can set the grid limits to the X and Y extents you want to use for your map. Once a grid file is created, you cannot produce a grid-based map larger than the extent of the grid file. If you find you need larger grid limits, you must regrid the data. You can, however, read in a subset of the grid file to produce a map smaller than the extent of the grid file.
When either the X, Y, or Z value is in a date/time format, the date/time values are converted and stored in the grid as numbers.
Spacing and # of Nodes (Grid Density)
Grid density is usually defined by the number of columns and rows in the grid, and is a measure of the number of grid nodes in the grid. The # of Nodes in the X Direction is the number of grid columns, and the # of Nodes in the Y Direction is the number of grid rows. The direction (X Direction or Y Direction) that covers the greater extent (the greater number of data units) is assigned 100 grid nodes by default. The number of grid nodes in the other direction is computed so that the grid nodes Spacing in the two directions are as close to one another as possible.
By defining the grid limits and the number of rows and columns, the Spacing values are automatically determined as the distance in data units between adjacent rows and adjacent columns.
Assign NoData Outside Convex Hull
Check the box next to the Assign NoData outside convex hull of data to automatically assign the NoData value to the grid nodes outside the convex hull of the data. Leave the box unchecked to extrapolate the data to the minimum and maximum grid limits, regardless of whether data exists in these areas.
Output Grid File
Choose a path and file name for the grid file in the Output grid file option. You can type a path and file name, or click the ![]() button to browse to a new path and enter a file name in the Save Grid As dialog.
button to browse to a new path and enter a file name in the Save Grid As dialog.
Advanced Gridding Parameters
Select Advanced gridding parameters for full control over the gridding method, advanced options, and grid geometry. After selecting Advanced gridding parameters, click the Advanced Gridding Parameters button to set the gridding options in the Grid Data dialog. See the Grid Data topic for more information on the advanced gridding parameters.
Back, Finish, or Cancel
Click Back to return to the Select Your Map Type page. Click Finish to create the map or add the layers to the existing map. Click Cancel to close the dialog without creating a map.