Text Editor
You can access the Text Editor by creating new text or by editing existing text. Type the desired text into the text editor, add templates and symbols, date/time stamps, and apply unique formatting. Add tabs in the Text Editor by pressing CTRL + TAB. When you click OK, the text in the text editor is parsed to math text instructions and the Text field is updated in the Properties window Text page.
|
|

Text Appearance
The top row of tools and buttons change the appearance of currently selected text. Additionally, subsequent text will appear with the selected options.
- Select a typeface from the list in the upper left corner of the dialog.

- Set the size (in points) of the typeface in the box to the right of the typeface list.

- Click the colored button to the right of the size box to display the color palette and change the text color. Click the Custom button at the bottom of the color palette to use a custom color.

- Several styles (including bold
 , italic
  , underline
  , and strikethrough
  ) can be applied to the text. Note that some typefaces, such as Symbol, do not support bold or italicized text.
 - You can left justify
 , center
  , or right justify
  the text in the bounding box. These options only make a difference with multiple lines of text.
Superscripts and Subscripts
When working with superscripts and subscripts, you can type the character, highlight it, and then click the superscript  or subscript
  buttons. Alternatively, you can click the superscript or subscript button and then type the characters. Click the superscript or subscript button a second time to return to the normal size font and placement.
After clicking the or  button, the superscript or subscript will be sized relative to the text immediately preceding it until the Text Editor is closed. Superscripts and subscripts are 60% the size of normal text by default. To maintain the relative sizing, select both the normal text and the superscript or subscript and then change the font size. For example, if 'x2' is typed in 10pt font and the '2' is superscripted, the font size for the '2' will be 6pt font, x2. Next if x2 is selected and font size is increased to 15pt, the superscript will be size 9pt font, x2. Once the Text Editor is closed, the superscripts and/or subscripts must be sized independently in the Text Editor. However, the Size (points) field in the Text Properties window page can be used to relatively increase the size of the normal, superscripted, and subscripted text all at same time.
If the default superscript or subscript placement is not sufficient, you can highlight the text and enter a number in the character position box ![]() to raise or lower text from the midpoint of the existing line. You can also change the character position by clicking the
to raise or lower text from the midpoint of the existing line. You can also change the character position by clicking the  buttons. Click the reset
  button to reset the highlighted character's position to the default position.
You can click in any field in a template and use the boxes below Sub Position to modify the position of the field in a template. The values are offsets from the main character's zero position and are in pixels. How far each value moves the template field is determined in part by the font size. Positive values move the field to the right and up.
Editing Tools
Text can be edited using the following tools:
- You can cut
 , copy
  , or paste
  selected text, or paste objects from the clipboard into the Text Editor.
 - Click the Insert Symbol button
 to open the Symbol Properties dialog and add a symbol to the text block.
- Click the Insert Date/Time button
 to open the Date/Time Format Builder dialog and enter a date and/or time format. The current date and/or time will be updated and displayed in the project every time the Surfer project is redrawn.
 - Click Insert Template button
 to open the Template Library dialog and enter equations based on a template.
 - You can undo
 and redo
  actions.
- You can magnify text in the Text Editor by entering a new number in the Zoom box. By default, the text is zoomed to a reasonable level.
- You can adjust the opacity of the selected text by entering a new number in the Opacity box. Enter a value between zero (no opacity, full transparency) and 100% (full opacity, no transparency).
Sub Position
|
|
You can click in any field in a template and use the boxes below Sub Position to modify the position of the field in a template. The values are offsets from the main character's zero position and are in pixels. How far each value moves the template field is determined in part by the font size. Positive values move the field to the right and up. The Sub Position values are only available when editing text in a template field. |

Linked Text
You may enter unchanging text such as an author name or document date, or you may enter text that updates every time the file is saved. Several types of automatically updating entries may be made in the Text Editor, as shown in the following table.
This feature IS for floating text or text in base layers. This feature does NOT apply to all places where the Text Editor is accessed (no axis labels, header/footer, base layer label templates, etc.).
|
Entry |
Description |
Result |
|
<<filename>> |
Displays the filename only. |
MyProject.srf |
|
<<filepath>> |
Displays the filepath only. |
C:\Temp\Projects |
|
<<fullpath>> |
Displays the filepath and filename. |
C:\Temp\Projects\MyProject.srf |
|
<<@cell>> |
Displays cell contents from the specified worksheet. |
|
|
<<date/time format>> |
Displays any of the defined date/time formats (for more information about supported date/time formats, see the "Date/Time Formats" section below) |
|
Dynamic Link Updates
When using dynamic link text, the text displayed will be a timestamp of the information at the time of creation. If the information is changed (e.g. the date, filename, etc.) you have to refresh the linked text to update the text. If the file is reopened it will not update by itself. To manually update the dynamic link text; select the Text object and in the Properties window, on the Text tab, click the Refresh button to the right of Text to update the text
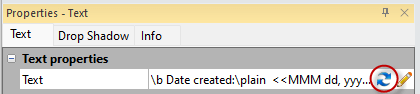
Click the Refresh button to update the dynamic linked text.
Date/Time Formats
This feature supports any combination of text that includes date/time characters in it, and will also works if non-date time text is included, so “<<dd aaa>>” would become “17 aaa”.
| months = M (upper case) |
M = 7 MM = 07 MMM = Jul MMMM = July |
| days = d (lower case) |
d = 7 dd = 07 ddd = Fri dddd = Friday |
| years = y (lower case) |
yy = 24 yyyy = 2024 |
| hours (12-hr) = h (lower case) |
h = 7 hh =07 |
| hours (24-hr) = H (upper case) |
H= 7 HH= 07 |
|
minutes = m (lower case) |
m= 7 mm= 07 |
|
seconds = s (lower case) |
ss = 47 or 07 |
|
am/pm = tt (lower case) |
tt = am or pm |
Date / Time examples
|
Linked text instructions in the Text Editor |
Date/Time displayed |
|
<<MMMM dd, yyyy at hh:mmtt>> |
July 25, 2024 at 11:35am |
|
<<MM/dd/yy>> |
07/08/09 |
Golden Nugget : Linked Date/Time formats apply to all letters in the dynamic link, be careful using words in your linked text that include any of the date/time directives.
EXAMPLE : <<dd is the day>>” would become "17 is t10e 17ay"
-
Note that the 'h' in 'the' and the 'd' in 'day' are identified as date time directives | <<dd is the day>> → "17 is t10e 17ay"
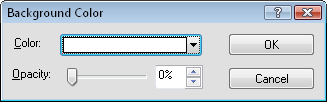
Background
Click the Background button to open the Background Color dialog to set the background fill properties for the text object. To edit the background fill for text that already exists, change the Background and Background Opacity options in the Properties window on the Text tab.
|
|
|
Set the background color and opacity in the Background Colordialog. |
Text Box Alignment
A reference point is the point clicked on in the view window after clicking the Features | Insert | Text command. The text box is horizontally and vertically aligned relative to the reference point. The default position is that the reference point is at the upper left corner of the bounding box (left, top).
- Right horizontally aligns the text box so that the reference point is to the right of the text box.
- Left horizontally aligns the text box so that the reference point is to the left of the text box.
- Center horizontally centers the text box on the reference point.
- Bottom vertically aligns the text box so that the reference point is below the text box.
- Top vertically aligns the text box so that the reference point is above the text box.
- Baseline vertically aligns the text box so that the reference point is located at the base of the text. The baseline is the imaginary line along which characters are positioned as they are drawn. Descenders on characters are drawn below the baseline.
To edit the alignment for text that already exists, change the Horizontal Alignment and Vertical Alignment options in the Properties window on the Text tab.
Resize the Text Editor
To make the Text Editor larger or smaller, click and drag on the lower left corner of the dialog. When the dialog is the desired size, release the mouse button.
OK or Cancel
Click the OK button to save your changes and close the Text Editor. Click the Cancel button to exit the Text Editor without saving your changes.