Print - Plot
Click the File | Print command or the  button in the plot window to print the active document.
The File | Print command in the plot window opens the Print dialog.
|
|
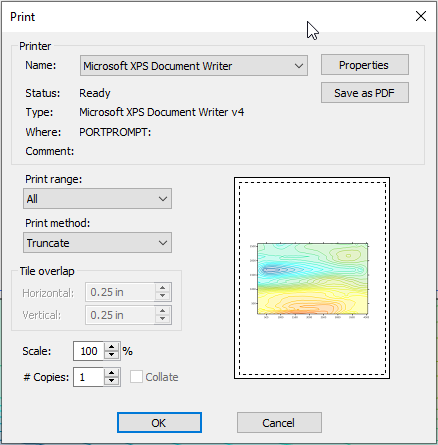
Printer
The Printer section contains options to specify the printer. The printer Status, Type, Where, and Comments are listed below the printer Name.
Name
The default system printer is listed in the Name field. If more than one printer is installed on the computer, use the down arrow to the right of the name field to select a different printer.
Properties
Click the Properties button to specify a printer and the printer properties. For information on specific printer settings, see the owner's manual for the printer.
Save As PDF
Click the Save as PDF button to save the plot as a PDF file. It is recommended to use the Save as PDF command rather than the Microsoft Print to PDF printer driver for creating PDFs.
Specify a file name and type, PDF (Vector) or PDF (Raster), in the Save as PDF dialog. Next, the Vector PDF Options or Raster PDF Options will be displayed depending on which file type you selected. Specify your export options and click OK.
Print Method
The Print Method options control how the document is printed on the page.
-
Fit to Page reduces the size of the plot so that it fits within the specified margins. Margins are set and displayed or hidden with the Layout tab commands.
-
Tile breaks the drawing into page size pieces and generates multiple pages of output.
-
View prints the current view in the plot window.
Print Range
The Print range options control how the worksheet pages are printed. All prints all the pages that contain data. Selection prints the selected worksheet cells.
Copies
Specify the number of copies to print in the Number of copies box. If two or more copies of multiple page documents are printed, check the Collate box to separate the copies into packets. Note that some printers do not allow multiple copies.
Collate
Check the Collate check box to collate the pages when printing multiple copies. Clear the Collate check box to repeat duplicates in the print order. For example assume two copies of a three-page document. When Collate is selected, the print order is p1, p2, p3, p1, p2, p3. When Collate is not selected, the print order is p1, p2, p2, p3, p3.
Overlap
Each page overlaps adjacent pages by the amount specified in the Horizontal and Vertical overlap fields. These options are only available when the Print Method is set to Tile . The Overlap is the amount of the map that is printed on both pages.
Scale
Scale is used when the Print Method is set to Truncate or Tile to reduce or increase the overall size of the drawing. A scale of 100% is actual size, 200% is twice as large, and 50% is half as large.
OK and Cancel
Click OK to start the print. Click Cancel to close the Print dialog without printing the plot document.