Lighting Properties
To edit a 3D surface map, click once on the surface map to select it. The properties for the surface map are displayed in the Properties window.
The Lighting page controls the lighting for the entire multi-layer map. This includes the surface, any overlays that may have been combined with the surface, and point vector data in 3D. The light source is fixed relative to the surface, so if the surface is rotated, the light rotates with it.
Lighting Properties
The following properties control the lighting appearance of the 3D surface map in the plot window.
|
|
|
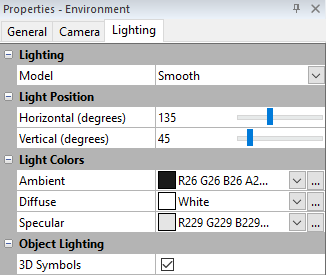
Change lighting properties in the Properties window on the Lighting page. |
Lighting
There are three lighting options. Click on the current lighting option next to Model. In the list, select the desired lighting option.
- None disables all lighting effects. The color shown is from the surface material color only.
- Smooth splits each grid cell into two triangular polygons. Gouraud shading is used to interpolate colors within the triangles from the three vertices of each triangle. This results in smooth transitions across the triangles and the entire grid, but it is slightly slower than flat shading.
- Flat uses a single vertex (grid node) to define the shaded color for the entire polygon. Note that each grid cell is divided into two triangular polygons. This results in a faceted look since each triangle is only filled with a single color.
Light Position
The Light Position section specifies the orientation of the light source. The light source can be thought of as the sun shining on a topographic surface.
The Horizontal (degrees) box defines the direction for the light source in the horizontal plane. Zero degrees corresponds to the light source shining from due east toward the west. Positive angles rotate the light source counterclockwise. For example, a specified horizontal angle of 90 degrees places the light source north of the unrotated surface. 180 degrees places the light source west of the unrotated surface and shining east. 270 degrees places the light source south of the unrotated surface and shining north. The default horizontal angle is set at 135 degrees, or NW. To change the Horizontal (degrees), highlight the existing angle value. Type a new value or click and drag the  to the desired angle position.
The Vertical (degrees) box rotates the light source in the vertical plane. A vertical angle of zero degrees places the light source at the horizon and shining horizontally. An angle of 90 degrees places the light source directly overhead and shining down onto the map. 180 degrees places the light source at the opposite horizon and shining horizontally. 270 degrees places the light source directly below the map and shining up. The default vertical angle is 45 degrees. As the vertical angle approaches zero, shadows lengthen and the overall display shifts to the colors at the left end of the color spectrum. To change the Vertical (degrees), highlight the existing angle value. Type a new value or click and drag the to the desired angle position.
Light Colors
There are three different types of light color, Ambient, Diffuse, and Specular. Note that these colors are used to represent reflectivity. White is 100% reflective and reflects the material color unaltered to the viewer. Black is 0% reflective, and causes all material color to be absorbed. Our perception of color is based on reflected and absorbed light. For example, a leaf appears green because it absorbs all colors in the light spectrum EXCEPT green. Since only green is reflected to your eye, the leaf appears green.
Surfer uses a pure white light source. The light "strikes" the surface and some of the light is absorbed based on the color of the surface material at the point the light ray struck it. Some light is reflected to the viewer according to the type of light (Ambient, Diffuse, and Specular), and the reflectivity color associated with each type of light specified in the Light Colors section.
- Ambient refers to light that has been scattered so evenly by the environment that its direction is impossible to determine. Increasing the ambient light component brightens the scene without casting shadows. The default Ambient color is 90% black which means that the ambient light contribution is fairly small.
- Diffuse refers to light coming from a particular direction and is brighter if aimed directly down on a surface than barely glancing off the surface. When diffuse light hits the surface, it is scattered uniformly in all directions so that it appears equally bright no matter where the eye is located. Increasing diffuse light intensifies shadow effects. The default Diffuse color is white, which is the maximum amount of reflectivity.
- Specular refers to light coming from a particular direction, and tends to bounce off the surface in a preferred direction. A shiny surface such as metal has a high specular component, while a surface like carpet has almost no specular component. Increasing the percentage of specular light results in strong shadow effects and more pronounced "shiny" or glare spots. The default Specular color is 90% black.
In general, these reflectivity colors should be specified as shades of gray in order to evenly reflect the surface material color components. However, special effects are possible by specifying non-gray colors for the reflectivity. For example, assume the Ambient reflectivity is set to pure red, and the Diffuse and Specular components are set to pure black. The Diffuse and Specular components are essentially disabled by setting their reflectivity color to black. The only light that is reflected to the viewer is red ambient light. Portions of the surface that lack a red component in the material color will appear black, since only red light is reflected to the viewer.