Map Source Dialogs
The following map source dialogs are accessed via the Download Online Maps or Download Online Grids dialog. The map source dialogs add, edit, and show information for source servers.
Add Map Source Dialog
Right-click on an existing category in the Download Online Maps dialog, and then click Add Map Source to open the Add Map Source dialog. This dialog adds new web servers to the list in the Download Online Maps dialog.
|
|
|
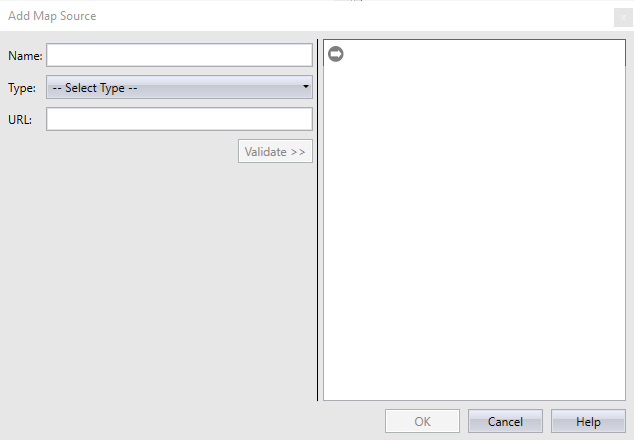
The Add Map Source dialog adds a new server to the selected category. Notice the Validate button is disabled. The Validate button is enabled once a URL is added to the Add Map Source dialog. |
Edit Map Source Dialog
Right-click on a user-added map source in the Download Online Maps dialog, and then click Edit to open the Edit Map Source dialog. This dialog is the same as the Add Map Source dialog, but includes the server information for the selected map source. Use the Edit Map Source dialog to edit the map source Name and URL.
View Map Source Dialog
Right-click on an pre-existing server in the Download Online Maps dialog, and then click Info in the context menu to open the View Map Source dialog. This dialog shows server and layer information. Editing the server name and URL is disabled in the View Map Source dialog.
Dialog Controls
The following section describes the purpose and use of the components in the View Map Source, Edit Map Source, and Add Map Source dialogs.
Name
In the Name section, type the name of the server. This is the name that is listed in the Download Online Maps dialog, so the name can be as descriptive as desired.
Type
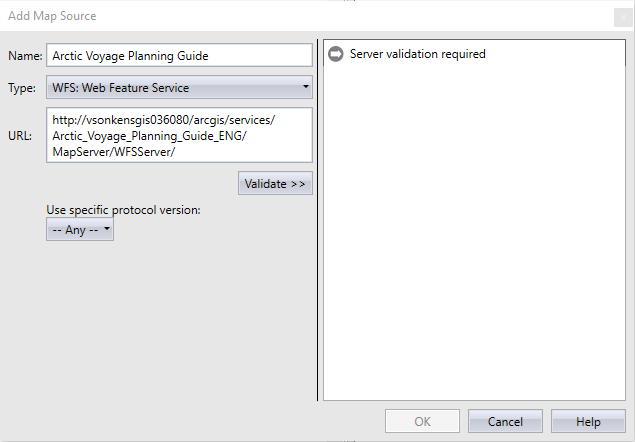
Select the Type from the list. Available types are WCS: Web Coverage Service, WFS Web Feature Service, WMS: Web Map Service, OSM: Open Street Maps, or XYZ Tile. Surfer can download vector data from WFS protocol 1.0.0, 1.1.0, and 2.0.0 servers.
URL
In the URL section, type the full internet location of the web service. The address must contain the http:// or https:// before the location. Sites with https:// or sites that redirect to SSL servers are supported.
Open Street Map URLs
OSM Open Street Map server URLs can be defined for multiple tiles by using variables in the URL:
-
Use ${s[i-j]} where i and j are the tile letters or numbers you wish to include in the data source, for example http://a.basemaps.cartocdn.com/light_all/${z}/${x}/${y}.png specifies all tile servers for the Carto Light source.
-
Use ${s[a,b]} where values a, b are the comma-separated tile letters or numbers you wish to include in the data source, for example http://${s[a,b]}.tile.openstreetmap.fr/hot/${z}/${x}/${y}.png specifies the two tile servers for the HOT Style OSM data source.
Example OSM URLs are displayed in the Add Map Source dialog when OSM: Open Street Maps is selected in the Type field. Also, when copying and pasting an OSM URLs from a web browser, the %7B and %7D characters will be automatically converted to { and }.
Use Specific Protocol Version
When contacting a server, Surfer allows the server to pick which protocol is used. Occasionally, a server will select a protocol that does not work well or does not work at all. Try specifying the protocol in the Use specific protocol version list if you are having issues with a specific WCS or WFS server. Protocol 1.0.0 is often the most reliable.
Surfer supports WCS protocols 2.0.1, 2.0.0, 1.1.3, 1.1.2, 1.1.1, 1.1.0, and 1.0.0. Surfer supports WFS protocols 1.0.0, 1.1.0, and 2.0.0.
Allow Server Redirects
Check the Allow server redirects check box to allow the WCS server to redirect requests from Surfer. Clear the check box to disallow server redirects. If a server validation fails, try clearing the Allow server redirects check box. The Allow server redirects option is only available when the Type is set to WCS: Web Coverage Service .
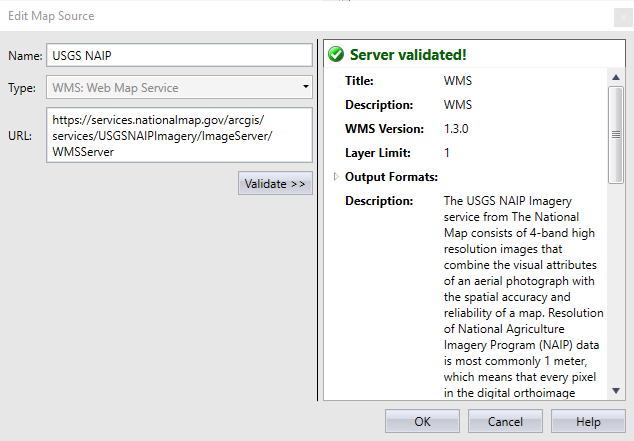
Validate New Server
The Add Map Source dialog contains a Validate button. The button is disabled when the dialog is first opened. After the URL is added for a new server, the information pane on the right displays Server validation required, and the Validate button is enabled. Click the Validate button to test the connection to the server. If the test is successful Server validated! is displayed in the information pane, as well as the server and layer information. If the server validation fails, an error message is displayed in the information pane. If you wish to stop the validation process, click the Cancel validation button to stop the server validation.
|
|
Server and Layer Information
The right pane of the View Map Source , Edit Map Source , and Add Map Source dialogs contains server information such as Title, Description, WMS Version, Bounding Box, etc. Click the ![]() to open a section. The arrow turns black
to open a section. The arrow turns black ![]() when a section is opened. Different servers will return different information. When a data source contains more than one layer, the layer information is listed for each layer. Click the
when a section is opened. Different servers will return different information. When a data source contains more than one layer, the layer information is listed for each layer. Click the ![]() to open a layer section. The layer information includes items such as Description , Bounding Box, Supported CRS, etc.
to open a layer section. The layer information includes items such as Description , Bounding Box, Supported CRS, etc.
Cancel or Finish
Click Cancel or the  button to return to the Download Online Maps dialog, without making any changes. Click OK in the View Map Source to return to the Download Online Maps dialog, making any changes to the Name, Type, or URL in the dialog. Click OK in the Add Map Source dialog to return to the Download Online Maps dialog, and the data source is added to the Select Data Source list.
Help
Click Help to open the online help file with information about the open dialog.