Download Online Maps or Grids
The Download Online Maps and Download Online Grids dialogs are used to download data from online servers when creating a map. The Download Online Maps dialog is displayed when creating a base map. The Download Online Grids dialog is displayed when creating a grid-based map. The difference between the two dialogs is very minor and is discussed in the Select Image Resolution to Download section below.
To open the Download Online Maps dialog, click the Home | New Map | Base from Server or the Home | Add to Map | Layer | Base from Server command.
To open the Download Online Grids dialog, click the Grids | New Grid | Grid from Server or the Download button in the Open Grid dialog.
These dialogs contain a server list and download options for downloading data from a web mapping service (WMS), Open Street Map (OSM), web coverage service (WCS), web features service (WFS), or XYZ Tile services (XYZ). Data can be downloaded from any of the predefined servers or you can manually add a server:
-
Download images from the predefined WMS servers in the following categories: Africa, Arctic, Antarctic, Asia and Middle East, Australia and Oceania, Europe, North and Central America, South America, Worldwide. Use these images to create a base map. Images can be used to create a grid-based map, but the grid values will be an arbitrary color index on a scale from 0 to 1. In almost all cases WMS servers should not be used for grid-based maps.
-
There are no predefined WFS servers, but Surfer does support this type of server and they can be added manually following the directions in the Adding New Data Sources section below. Use the vector data to create a base map. WFS servers cannot be used to create a grid-based map. Surfer can download data from WFS protocol 1.0.0, 1.1.0, and 2.0.0 servers..
-
There are no predefined WCS servers, but Surfer does support this type of server and they can be added manually following the direction in the Adding New Data Sources section below. Use the grid data to create a grid-based map. WCS servers cannot be used to create a base map.
-
Download images from the predefined XYZ and OSM servers in the XYZ Tiles Category. Use these images to create a base map. Images can be used to create a grid-based map, but the grid values will be an arbitrary color index on a scale from 0 to 1. In almost all cases OSM and XYZ Tile servers should not be used for grid-based maps.
The Download Online Maps and Download Online Grids dialogs can access servers that require a proxy server connection. Surfer uses the proxy server settings set in the Windows Internet Options, accessed via the Windows Control Panel.
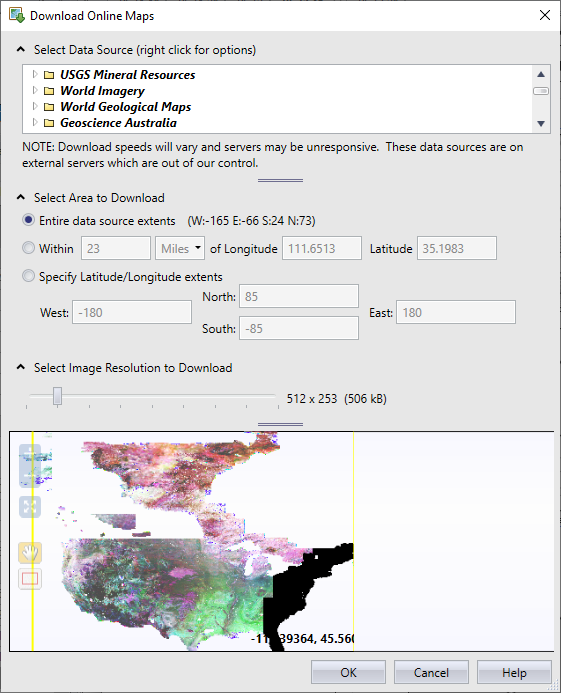
Select or add the server, specify extents and resolution, and download layers in the Download Online Maps dialog.
Data Source
The Select Data Source list contains servers and layers, separated in categories, from which map data or images can be downloaded. The categories are Africa, Arctic, Antarctic, Asia and Middle East, Australia and Oceania, Europe, North and Central America, South America, Worldwide, XYZ Tiles, and Favorites. These categories include subcategories with sample servers. In the Select Data Source section, click the arrow ![]() to expand a category, subcategory, or server. The arrow turns black
to expand a category, subcategory, or server. The arrow turns black ![]() when a section is opened. Click the black arrow
when a section is opened. Click the black arrow ![]() to collapse the category or server.
to collapse the category or server.
Adding New Categories
Right-click on an existing category or in the white space of the Select Data Source list and click Add New Category to add a user-defined category to the Select Data Source list. After clicking Add New Category, a new category folder is created at the bottom of the list. The category can be renamed immediately after adding the category. If desired, type in a new name for the category. Then press ENTER or click elsewhere in the Select Data Source list to finish creating the category. The new category folder can be deleted by right-clicking on it and clicking Delete.
Server and Layer Information
To see additional options for a specific server, right-click on the server in the Select Data Source section, such as the Europe > Geological Maps Eu > Spain server.
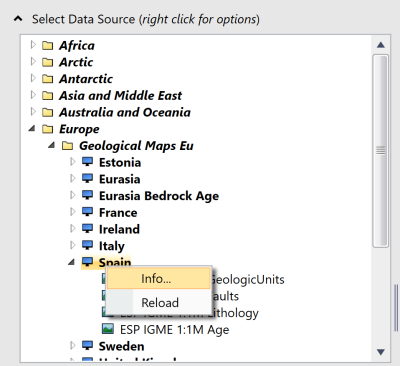
Right-click on the server name and select 'Info...' to see the URL for the server and information about the server's layers.
Click Info to view data source and layer information for the selected server. The information is presented in the View Map Source dialog. The View Map Source dialog window displays the data source and layer information for the selected server. It also displays layer information such as the minimum scale, height and width, layer name and title. None of this information is editable.
The layer list from the data source is cached on the local hard drive. This reduces the load time for the Select Data Source list. Update the layer information by right-clicking on the data source and selecting Reload in the context menu.
To copy the server and layer name, right-click on the layer name and select Copy to Clipboard. You can then paste the text to any text editor, or word processing program. The pasted information includes the name of the server, the server location, the selected layer title and layer name.
Arranging the Data Source List
To rearrange the categories, drag the category name above or below others to the position you want. Servers and their respective layers can be reordered within a category using the same method.
Favorites Category
To add any layer to the Favorites category, right-click on the layer name and select Add Favorite. Only the selected layer is added to the favorites. Other layers from the same server are not added automatically.
To add a new server to the Favorites category, right-click on the Favorites category and select Add Map Source. Use the Add Map Source dialog to add the data source. To copy any existing server to the Favorites category, click and drag the server to the Favorites folder, or right-click the server name and select Add Favorite.
To remove a server or layer from the Favorites category, right-click on the server or layer name in the Favorites category and click Delete. Click Yes in the dialog to remove the server or layer from the Favorites. Click No in the dialog to keep the server or layer in the Favorites. Removing the server or layer from the Favorites category does not remove the server or layer from any other category.
Adding New Data Sources
To add new data sources to the list, right-click on the a category in the Select Data Source section. Click Add Map Source to open the Add Map Source dialog. Set the Name, Type, and URL to the new web service. Click Validate and the web server will be tested. If the test is successful, click OK and the new web service is added to the Select Data Source list. If the test is not successful, verify the URL and Type are correct.
All custom data sources are saved to an XML file, allowing multiple Golden Software programs to use the custom definitions. Servers that have been added in previous Surfer versions or in other Golden Software programs will be automatically added to the server list. The XML file is located at C:\Users\<username>\AppData\Roaming\Golden Software\Shared\Geode.xml. The file can be copied from one computer to another to share custom data sources between multiple computers and users.
When sharing the Geode.xml file between a previous version of Surfer and the current version, the Data source list may include servers with unsupported protocols for the current Surfer version. If this happens, the unsupported server will be displayed in the Data Source list. However, the server name will be disabled in the list, and you will not be able to download data from the server.
Editing Data Sources
To edit the data source for any user-defined server, right-click on the server name and click Edit. The Edit Map Source dialog updates the web server Name, Type, and URL. This may be useful if the location for the server changes or if the name listed in the Download Online Maps dialog should be changed. The Edit Map Source dialog also displays information about the server and layers. Predefined servers cannot be edited.
To view information about the server, right-click on the server name and click Info. The View Map Source dialog opens and displays the server and layer information. The Name, Type, and URL cannot be edited in the View Map Source dialog.
Deleting Data Sources
To delete a user-defined server from the Select Data Source list, right-click on the server name and click Delete. In the Delete Data Source dialog, click Yes to delete the server. Click No to keep the server in the Select Data Source list. Predefined servers cannot be deleted.
Select Area to Download
The Select Area to Download section controls the areal extent of the imsage being downloaded. Available options are Entire Data Source Extents, Specify Radius, or Specify Latitude/Longitude Extents. Click on the desired option to select it.
Select the extents of the map to download in the Select Area to Download section.
The Entire Data Source Extents reads all of the data on the specified server. All of the data is downloaded in the single image. With servers that cover large areas, this option is not recommended because even at high resolutions, very little detail will appear on the downloaded map.
The Specify Radius option allows a single longitude and latitude value to be entered. A square area is downloaded based on the distance value and the units option. The square is centered on the value entered for the Latitude and Longitude. The Latitude and Longitude options also have an up and down arrow to change the area of interest slightly. If these arrows are pressed for more than a couple of seconds, the speed at which the longitude/latitude changes will increase. To use the Specify Radius option, enter valid values in each of the following four fields.
- The first field is a box that sets the width and height of the square area. The example below has this set to 25.
- The second field sets the unit, which can be chosen from a drop-down menu. You can select either Kilometers or Miles by clicking on the current option. The example indicates Miles.
- The third field sets the central Latitude value. For instance, the center point in the example is set to 39.753304. Latitude values should range from -90 to +90, with negative values for the southern hemisphere and positive values for the northern hemisphere.
- The final field specifies the central Longitude value. In the example, the center point is set to -105.220139. Longitude values should fall within -180 to +180, where negative values represent the western hemisphere and positive values represent the eastern hemisphere.
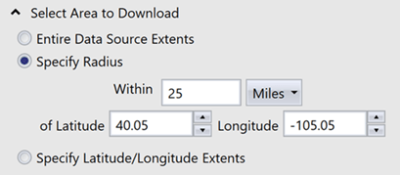
The downloaded area will be 25 miles wide and 25 miles tall.
The image will be centered on the latitude and longitude of 40.05, -105.05.
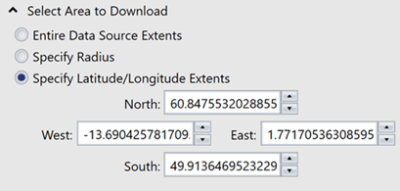
The Specify Latitude/Longitude Extents option allows a rectangular area to be input in latitude and longitude coordinates. When adding a base map layer to an existing map with a defined coordinate system, this option is automatically selected. The boxes are filled in with the map limits of the current map. After selecting this option, follow the steps below to specify your Latitude/Longitude extents.
- Type in the western-most edge for the downloaded map in longitude degrees coordinates in the West box. Longitude values must be between -180 and +180. Negative values are western hemisphere longitudes. Positive values are eastern hemisphere longitudes.
- Type in the eastern-most edge for the downloaded map in longitude degrees coordinates in the East box. Longitude values must be between -180 and +180. Negative values are western hemisphere longitudes. Positive values are eastern hemisphere longitudes.
- Type in the northern-most edge for the downloaded map in latitude degrees coordinates in the North box. Latitude values must be between -90 and +90. Negative values are entered for the southern hemisphere. Positive values are entered for the northern hemisphere.
- Type in the southern-most edge for the downloaded map in latitude degrees coordinates in the South box. Latitude values must be between -90 and +90. Negative values are entered for the southern hemisphere. Positive values are entered for the northern hemisphere.
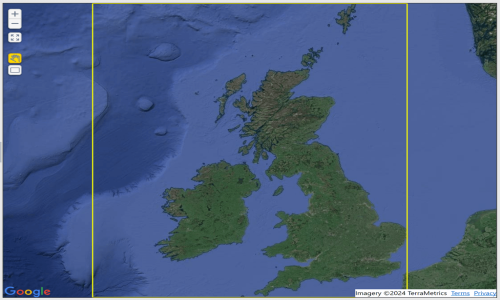
The downloaded area will cover from cover from -13.69 to 1.77 degrees longitude and 49.91 to 60.84 degrees latitude.
Select Image/Grid Resolution to Download
In the Download Online Maps dialog, the Select Image Resolution to Download section controls the quality of the image being downloaded. While in the Download Online Grids dialog, the Select Grid Resolution to Download controls the quality of the grid being downloaded.
Move the slider to the right to increase resolution, to the left to decrease resolution, or click on the slider bar to jump to a specific resolution. Below the slider the image dimensions and size are displayed. A higher resolution download results in a larger file. The larger the file size, the longer the image will take to process and the more memory the program will use to manipulate the image.

Set the image quality by dragging the slider to the right or left.
The selected WMS server may have an original data source resolution (for example, 1 meter/pixel) for its imagery. You may be able to select an image resolution higher or lower than this original data source resolution. Increasing the image resolution here cannot give you better image detail over the original data source. By requesting a higher resolution than the original data source, the image is simply larger in size and in the number of pixels. The server returns the requested image in the requested size. Some servers provide resolution information, and if so, this information and be found in the View Map Source dialog. If the server does not provide resolution information, consider checking the server provider's documentation.
OSM servers may have more than one layer available. When this is the case, increasing the Image Resolution to Download may download a more detailed image. For example with the Carto Light predefined server, using the default Image Resolution to Download will download the image as displayed in the preview, and increasing the resolution will download an image that includes more geographic names and more detailed streets. Just as with the WMS servers, eventually increasing the Image Resolution to Download will exceed the original data source resolution for the most detailed layer, and this will result in downloading larger images with no appreciable difference.
WFS servers provide vector data. When a WFS server is selected the Select Image Resolution to Download slider is disabled.
If a WCS server only provides only one resolution, such as the SRTM Global 90m (GMU) predefined server, the Select Grid Resolution to Download slider is disabled.
In some instances a  may be displayed next to the image size estimate. This occurs when the selected resolution is outside the recommended scale for the sever. Hover the cursor over the to display information about the warning. Generally this warning is removed by increasing the Image Resolution to Download by moving the slider to the right or reducing the Area to Download selection.
Image Preview
The Preview section displays a picture of the area to be downloaded. The Preview section uses low resolution previews. The final output image quality is controlled by the Select Image Resolution to Download. Some servers use scale-dependent rendering. If a preview is not displayed but no errors are visible in the Data Source or Preview sections, then try zooming in and/or out until you find the correct scale for the server.
-
For OSM, XYZ, and WMS servers, the Preview section contains a low resolution preview of the image.
-
For WCS servers, the Preview section shows a coverage footprint over a map.
-
For WFS servers, the Preview section shows a coverage footprint over a map. The preview can also include vector data for the selected area to download. The preview is not displayed automatically for vector data from WFS servers, because all vector data must be downloaded first. The data download and rendering may take a few seconds or up to a few minutes depending on the size of the area to download and the WFS server. Set the Select Area to Download before enabling the vector data preview. The vector data preview must be enabled manually by clicking the
 button. If you preview the vector data and make no changes to the area to download extents, it will not be necessary to download the data again when clicking OK. If the preview is taking longer than you would like to wait, click the Cancel button in the lower right portion of the dialog, next to the preview status bar.
The Preview window displays the area to download, buttons to zoom in/out, pan,
or change the download area, a map scale, and the coordinates of map cursor.
-
Click the
 buttons on the left side of the image preview to zoom in or out on the area. Changing the zoom level does not affect the area to download. The area to download is indicated in the Preview section by a yellow outline.
 -
Click the
 button on the left side of the image preview to zoom to the selected area extents. Changing the zoom level does not affect the area to download. The area to download is indicated in the Preview section by a yellow outline.
 -
Click
 button on the left side of the image preview to quickly move the image in the Preview section. The cursor changes to
  , indicating pan mode. Click and hold the left mouse button down and drag the image to change the view; the cursor changes to
  to indicate the left mouse button is held. Changing the view does not affect the area to download. The area to download is indicated in the Preview section by a yellow outline.
 -
Click the
 button on the left side of the image preview to change the extents of the image that is downloaded. The cursor changes to
  , indicating draw mode. Click and hold the left mouse button down and drag the mouse over the area to download. The zoom extents update and the yellow box coincides with the area drawn. The Select Area to Download also updates. Only the portion of the image highlighted by the yellow box will download.
 -
Click the
button to download the vector preview for the selected area to download. Additionally, the vector data preview may be simplified in the Download Online Maps dialog. The  icon is displayed if preview simplification has occurred. Even if the preview is simplified, all vector data will be added to the map layer when clicking OK.
 -
If the server or selected layer returns an warning, a
 and/or is displayed in the Preview section. Hover the cursor over the warning icon to view more information about the warning.
Download Legend Image
Online servers that host legends for the server layers can be downloaded when downloading the base map image in WMS servers. If the server hosts a legend and the server and area of interest are selected, a check box on the bottom right of the Download Online Maps window will be displayed. Check this box to download the legend for the selected server. Appearance of legends will vary, as Golden Software does not host these online data source.

The Download Legend Image checkbox indicates that there is a legend that on the
server that is available to download. Check this box to download the server legend.
Attribution for Default Servers
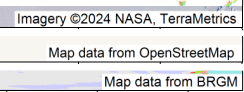
All predefined servers in Surfer have attribution information that adheres to each servers specific attribution requirements. The attribution information will be added to the image at the bottom-right of the layer that downloads from the server. With the Download Online Maps preview, the attribution information will also be displayed, with a link to the specific webpage for that server. When downloading the image, the link will not be present in the image in Surfer. To learn more about any predefined server or their attribution requirements, please click on the link in the preview window.
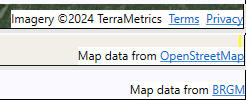
Left : Examples of attribution information in preview window, with links.
Right : Examples of attribution information in downloaded image.
Please note that the resolution of the map you download directly impacts the size of the attribution. A higher resolution will cause the attribution to appear smaller, which is consistent across all server-based maps in Surfer, including Google Road Maps' town and road names. A lower resolution, however, will display larger attribution (and text for Google Maps). This behavior is determined by the pixel size chosen by the user and is outside of our control.
OK, Cancel and Help
Once all of the options are set, click OK to download the image, grid, or vector data. Click Cancel to cancel the download and return to the Download Online Maps window. Click Help to open the help file. A progress bar is displayed showing download progress and number of bytes (kB, MB, or GB) downloaded.
Clicking OK in the Download Online Maps dialog downloads the map layer and creates a new base map or adds a base layer to the select map frame. Clicking OK in the Download Online Grids dialog opens the Save Grid As dialog or creates a new grid based layer.
If the OK button is not available, the layer is not selected. Go back to the Select Data Source section and select a specific layer, not a server name.
Server Responsiveness
Note: Download speeds will vary, depending on the server selected. Some servers may become unresponsive. These data sources are on external servers which are out of Golden Software's control. If one server is unresponsive or slow to download, you may wish to select a different server.
Naming Convention
Base maps from servers are named with the map server name, such as Base-USGS_EROS_Ortho_NAIP. In addition, the image downloaded with the base map from server adds attribute information, including the server name and layer title.
Grid-based maps created by clicking Download in the Open Grid dialog are named with the map type and server name, for example Contours-NED Contiguous U.S. 1 3W arc second elevation data.
Changing the Window and Section Sizes
The Download Online Maps and Download Online Grids dialogs can be resized by clicking and dragging a side or corner, as with normal windows. The image preview and Select Data Source sections can also be enlarged or reduced by clicking and dragging the double horizontal bars between the sections of the dialog.