Create Contact
Click the 3D View | Drillhole Contacts | Create command to create contact picks from drillhole data. This will open the Create Contacts dialog. The Create Contact command is only active if you have a drillhole selected in the Contents window and have interval, keyword, or point data. In the Contents window, you can also right click Contacts and any individual contacts listed to Create Contacts, Edit Contacts, and Export Contacts.
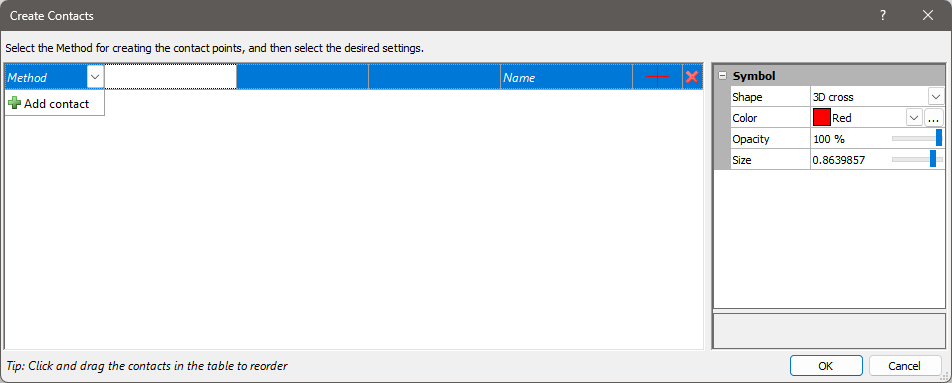
Use the Create Contacts window, to set the properties of the contacts.
Method
Method is how the contact is defined. The contacts are listed from youngest at the top to oldest at the bottom, and you can simply drag and drop them to rearrange the order.
Golden Nugget : You can create contact definitions with a mix of Methods. For example, you could use Upper/Lower to define most of your lithology using lithology keywords, but you could define the water level using information from a Points table defined using a Query.
-
Upper/Lower = This is only available when drillhole keywords exist, and the keywords are used to define the contact. You select a contact based on the keyword above the contact, and the keyword below the contact.
-
Once Upper/Lower is selected, the next field available is Field. Select a keyword from the dropdown, then set the Upper and Lower keywords related to that keyword.
-
If the Upper field is set to Any others, then the default contact pick would look for the first encountered from top down.
-
If the Lower field is set to Any others, then the default contact pick would look for the first encountered from bottom up.
-
For example:
-
If you want to draw the contact between overburden and sandstone, the “overburden” could be the upper keyword and “sandstone” could be the lower contact.
-
If you want to draw the bottom of a Sandstone layer with different layers underneath it in different parts of your map, then you would set the Upper to be Sandstone and the Lower to be Any others.
-
-
-
Data Query = This is only available with drillhole data in Intervals or Points tables. This is if you can determine the contact point based on data in these tables. For example, you might be able to detect a change when the geophysical data values go above or below a certain value. Or, if you want to create a single contact at a particular point (e.g. the top of a coal seam) and you have this noted in one of the tables.
-
Intervals : The second field allows you to specify which table to use for the query. If your drillhole data only includes an Intervals table, it will be automatically selected. Similarly, if you only have a Points table, that will be the default selection. If your data contains both Intervals and Points tables, the Points table will be selected initially, but you have the option to switch to the Intervals table if that's more appropriate for your query.
-
Query : The third field is the Query. You can type in the query you want, or you can click the (…) button to open the Query Contacts dialog. Here you can build the query to use or select from a previously used query, similar to the drillhole filtering dialog.
-
Depth : The next field is Depth location. This is grayed out if you use a Points table. This is active if you used an Interval table. If you used an interval table, the options here are Top, Center, and Bottom and this tells you where in the interval to put the contact (at the top of the interval, at the bottom of the interval or in the center of it).
-
-
Name = The default name is 'Upper - Lower' or the query you used.
-
Depositional or Erosional : This field defines the type of contact, i.e. Depositional or Erosional.
-
Depositional: Depositional surfaces cannot cut into an underlying older unit, please note there is only one contact point per unit per drillhole.
-
Erosional: Erosional surfaces can cut into an underlying older unit, please note there is only one contact point per unit per drillhole.
-
-
Symbol. This is the symbol that will be used for the contact point location on the drillholes. You can change the shape, color, opacity and size. The default Size is 50% larger than the largest cylinder size for the drillholes. The Shape is limited to true 3D shapes (currently only 3D cross, cube and sphere).
-
Delete X. This allows you to delete a contact definition.
-
OK : Click the OK button to create the contacts
Golden Nugget : When creating surfaces from contacts, both the type of contact and its relative age are crucial for defining how a surface will interact with others. It's vital to set both the type and the age in this dialog, as the relative age can only be defined here. The contacts are listed from youngest at the top to oldest at the bottom, and you can simply drag and drop them to rearrange the order.
Notices after clicking [OK] in the 'Create Contacts' window
-
Contact points are already created for contact 'Name'. Do you want to recreate all contact points?
-
You get this message if you already created contacts, but you go back to Create and either modify one or more, or add more. This is asking what to do with the contact point locations you already created.
-
Yes = Click Yes and all contact points are recreated in the default locations. If you haven’t edited any contact points, this is just fine.
-
No = Click No if you don’t want to recreate the points already created. This would be if you edited the point locations, and just wanted to change the symbol properties.
-
-
-
Contact points could not be created in any drillholes for contact 'Name'
-
You can get this message if the contact definition wasn’t fulfilled in any drillholes, so no points for that contact were created.
-
You can get this message if the contact definition for ‘Name’ isn’t properly defined or doesn’t apply.
-
Individual contacts listed
In the Contacts window, under the Drillhole | Drillhole | Contacts, is listed each individual contact. You can select any of the contacts and edit the symbol properties for that contact. You can uncheck or delete any of the contacts. Once a contact has been selected, look at the Properties window on the Info tab to can see how many drillholes encounter that contact.
Notes on Contacts
-
Contacts are created by default at the first encounter that fulfills the contact definition, going from the top of the drillhole downwards. This may or may not be the desired location. If not, you can edit the contacts.
-
There can be only one point per contact definition per drillhole. If there are two contacts for “coal”, then Surfer can only create one point for that contact. For example consider naming one “coal” and the other “coal2”.
Create Surfaces
Surfer can now automatically create surfaces for each contact you have defined from your drillhole data. These surfaces, which are visible in the 3D view, are defined by the contact points and can be further customized. Before creating surfaces, you must first create contacts for your drillholes.