Math Text Instruction Syntax
The math text instruction set offers advanced formatting of text in the Surfer plot window. Math text instructions can be used to change the typeface, size, color, weight, and style of text on a character-by-character basis. Greek letters and mathematical symbols can be written in the plot window using math text instructions. The math text instructions also allow for the detailed placement of characters and symbols; thus, superscripts, subscripts, and the superposition of characters are possible. The worksheet cells used as post labels in a post plot can contain math text instructions. In general, the clipboard can be used to cut and paste math text instructions.
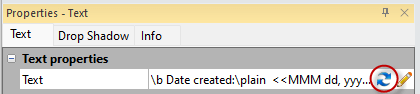
All text within the plot window can be controlled by math text instructions. For example, an axis label, title, or text block can include math text instructions in the text string in the Properties window. In the Properties window, add the math text instructions below directly in the Title text, Prefix, Suffix, or Text option. Do not open the Text Editor as text in the Text Editor cannot use math text instructions. To use different text properties in the Text Editor , highlight the text to change and click the appropriate button or command in the dialog.
Unless otherwise indicated, all math text instructions begin with a backslash ("\"), and end with a single space. For example, the instruction "\up50" shifts the baseline of the text up 50 percent of the current text height. All characters from the beginning backslash through the ending single space are interpreted as instructions by the math text interpreter, and are not included in the resulting label.
Each line in a text block starts with the default text properties such as typeface, size, color, and style. (Note that some typefaces, such as Symbol, do not support bold or italicized text.) A line of text within a text block uses the current properties until a math text instruction is encountered. All text following an instruction is modified according to the instruction. For example, if the typeface is changed in the middle of a text string, the text following the instruction will use the new typeface until the end of the line of text is reached, or until another instruction affecting the typeface is encountered.
Encapsulate Math Text Instruction
Math text instructions can also be encapsulated so they are not carried out over an entire line. A left curly brace ("{") instructs the math text system to remember all of the text properties in effect at that point. A right curly brace ("}") restores the properties to what they were at the matching left curly brace. This allows the insertion of special text in the middle of an otherwise uniform text block. The only instructions this does not apply to are text baseline instructions \dnX and \upX), and the position instructions (\rpX and \spX). Curly braces can be nested.
To incorporate a backslash, right curly brace, or left curly brace as a text character in a text block, precede them with a backslash when entering the text string. For example, "\\" produces "\", and "\{" produces "{".
Percentage Instructions
Instructions based on a percentage, such as font size, are cumulative. This means that a second percentage change within a text block is interpreted as a percentage of the first percentage change. For example, if the font is scaled by 50%, and later in the same text block the font is scaled by 50% again, the font size after the second percentage would be 25% of the original font size.
Note: Instruction names are case insensitive (\fs50, \FS50, \Fs50 or \fS50 are all valid).
Note: The \sp and \rp instructions only refer to positions on the same line.
Linked Text
You can use math text instructions to insert file properties or date/time information into a text block. This feature is for floating text or text in base layers. Please note that this feature is not available in every instance of the Text Editor. Exclusions include axis labels, headers/footers, and base layer label templates, among others.
These instructions are enclosed in double angle brackets << >>. The behavior of the text depends on the type of instruction used.
-
File Properties: Instructions like <<filename>> refer to the file's metadata. If you use the File | Save As command to rename the file, these text strings will update automatically to reflect the new name or path.
-
Date/Time: Instructions using date formats (e.g., <<MM/dd/yyyy>>) act as Dynamic Links. They insert a timestamp of the current moment. They do not update automatically when the file is saved or reopened.
Several types of automatically updating entries may be made in the Text Editor, as shown in the table below.
|
Entry |
Description |
Result |
|
<<filename>> |
The file name (extension included) |
MyProject.srf |
|
<<filepath>> |
The file path (no file name) |
C:\Temp\Projects |
|
<<fullpath>> |
The full file path and file name. |
C:\Temp\Projects\MyProject.srf |
|
<<@cell>> |
Displays cell contents from the specified worksheet. |
|
|
<<date/time format>> |
Displays any of the defined date/time formats (for more information about supported date/time formats, see the "Date/Time Formats" section below) |
|
Date/Time Dynamic Link Updates
Date and time instructions (such as <<MMMM dd, yyyy>>) are considered Dynamic Links. When you create a text box with this syntax, it captures the system time at that specific moment.
Important: Date/time text does not update automatically when the file is saved, printed, or reopened. It acts as a static timestamp of when the text was last modified or refreshed.
You can update the date/time using any of the following steps:
-
Dynamic Link Update command
-
Select the text object.
-
Click the Graph Tools | Plot Tools | Dynamic Link Update command.
-
The text will refresh to display the current system date and time
-
-
Refresh command
-
Select the text object
-
In the Properties window click the Refresh button to update the dynamic linked text
-
-
Double-click the text object to open the Text Editor and click OK. This re-evaluates the instruction and updates the time
Instructions that Change Typefaces, Sizes, and Styles
|
Math Text Instruction |
Result |
|
\b |
All text after the \b command is bold. |
|
\f"X" |
Change to the typeface named X. These are the names listed in the Face list box in the Text dialog in the plot window. Typeface names are case sensitive. Enclose the face name in double quotes. If the typeface is not found, a generic stick typeface is used in place of the unfound typeface. |
|
\fsX |
Change font size to X% of current font size. For example, a value of 200 for X increases the font size by two, and a value of 50 for X decreases the font size by one-half. |
|
\i |
All text after the \i instruction is italicized. |
|
\plain |
This sets the text to "plain" text with normal weight, no italics, no underlining, and no strikethrough. |
|
\strike |
|
|
\ul |
All text after the \ul instruction is underlined. |
Instructions that Change Text Color
The following instructions are provided to make it easy to set basic text colors:
|
Math Text Instruction |
Result |
|
\black |
Sets the text color to black. |
|
\blue |
Sets the text color to blue. |
|
\green |
Sets the text color to green. |
|
\cyan |
Sets the text color to cyan. |
|
\red |
Sets the text color to red. |
|
\magenta |
Sets the text color to magenta. |
|
\yellow |
Sets the text color to yellow. |
|
\white |
Sets the text color to white. |
|
\gray |
Sets the text color to gray. |
The following instructions allow the text color to be set to an arbitrary RGBA (Red,Green,Blue, Alpha) value:
|
Math Text Instruction |
Result |
|
\rgbrX |
Sets the amount of red in an RGBA text color (X=0 to 255). |
|
\rgbgX |
Sets the amount of green in an RGBA text color (X=0 to 255). |
|
\rgbbX |
Sets the amount of blue in an RGBA text color (X=0 to 255). |
|
\rgbaX |
Sets the alpha value in the RGBA text color (X=0 to 255). |
|
\color(r,g,b,a) |
Sets the amount or red, green, blue, and alpha value in the RGBA text color. r, g, b, and a are all a value between 0 and 255. |
Instructions that Change Text Position
|
Math Text Instruction |
Result |
|
\dnX |
Moves text baseline down X% of current font size (subscript). This instruction produces subscripts or returns the baseline to the original position following a \upX instruction. If a font size (\fsX) instruction follows the \dnX instruction, any subsequent \dnX or \upX instructions are relative to the changed font size. |
|
\n |
Creates a new line in the text block. This works similar to a carriage return - line feed combination. This should be used instead of the \dnX to create a new line of text. |
|
\rpX |
Restores the current position to position #X (X = 1 to 20). This instruction is used in conjunction with the \spX instruction. Any text following this instruction begins at the position defined with the \spX instruction. If the \rpX instruction is used without first setting a position with the \spX instruction, the position for the text is returned to the stating position for the text block. |
|
\spX |
Saves the current position as position #X (X = 1 to 20). The position is the up, down, left, and right areas within the text block. When the \spX instruction is used, the current location within the text block is assigned a position number. Return to this position using the \rpX instruction. Specify the position number assigned with the \spX instruction when using the \rpX instruction. These instructions are most useful when placing both superscript and subscripts after the same character. |
|
\upX |
Moves the text baseline up X% of current font size (superscript). This instruction is used to produce superscripts or to return the baseline to the original position following a \dnX instruction. If a font size (\fsX) instruction follows the \spX instruction, any subsequent \upX or \dnX instructions are relative to the changed font size. |
Instructions Used to Insert Special Characters or Date and Time
|
Math Text Instruction |
Result |
|
\aX |
Insert an ANSI character with code given by X (0 to 255). Generally, this instruction is needed for characters with ANSI numbers beyond the normal limits of the keyboard. For example, use the ANSI character code to include an integral sign in a text string. By determining the character set, followed by the \aX command to specify the correct character number. For example, an integral sign is located at ANSI position 242 in a symbol set called Symbol. Type \f"Symbol" \a242 for the integral to appear in the text block. The Character Map program is an accessory program in the Windows installations. Use the Character Map to display each of the available character sets with the ANSI code. The ANSI code is displayed in the right half of the Character Map status bar when a character is selected. |
|
\date |
Inserts the current date. Be sure to follow this instruction with a space, even if no other text follows the date. The date is updated every time the text is redrawn. |
|
\time |
Inserts the current time. Be sure to follow this instruction with a space, even if no other text follows the time. The time is updated every time the text is redrawn. |
|
\dt("format") |
Inserts the current date and/or time as indicated by a custom format string. Be sure to follow this instruction with a space, even if no other text follows the closing parenthesis. The date and or time is updated every time the text is redrawn. |
Date/Time Formats
This feature supports any combination of text that includes date/time characters in it, and will also works if non-date time text is included, so “<<dd aaa>>” would become “17 aaa”.
| months = M (upper case) |
M = 7 MM = 07 MMM = Jul MMMM = July |
| days = d (lower case) |
d = 7 dd = 07 ddd = Fri dddd = Friday |
| years = y (lower case) |
yy = 24 yyyy = 2024 |
| hours (12-hr) = h (lower case) |
h = 7 hh =07 |
| hours (24-hr) = H (upper case) |
H= 7 HH= 07 |
|
minutes = m (lower case) |
m= 7 mm= 07 |
|
seconds = s (lower case) |
ss = 47 or 07 |
|
am/pm = tt (lower case) |
tt = am or pm |
Date / Time examples
|
Linked text instructions in the Text Editor |
Date/Time displayed |
|
<<MMMM dd, yyyy at hh:mmtt>> |
July 25, 2024 at 11:35am |
|
<<MM/dd/yy>> |
07/08/09 |
Golden Nugget : Linked Date/Time formats apply to all letters in the dynamic link, be careful using words in your linked text that include any of the date/time directives.
EXAMPLE : <<dd is the day>>” would become "17 is t10e 17ay"
-
Note that the 'h' in 'the' and the 'd' in 'day' are identified as date time directives | <<dd is the day>> → "17 is t10e 17ay"
Examples of Math Text Instructions
Due to page size limitations, some of these examples contain multiple lines of math text instructions. These examples must be entered on one line for the text to be displayed correctly.
|
Math Text Instruction |
Result |
|
CO\dn50 2 |
CO2 |
|
x\up50 2 |
x2 |
|
\sp1 {\fs200 \f"Symbol" \a229 \sp2 }{\rp1 \dn90 \fs75 i=1\rp1 \up220 n}\rp2 \up25 X\dn50 {\fs75 i}\up50 Y\dn50 {\fs75 i}\up50 = S{\dn50 {\fs75 XY}\up50 } |
|
|
{\i Avogadro} Constant = 6.022 x 10{\up50 {\fs75 23}\dn50 } |
Avogadro Constant = 6.022 x 10²³ |
|
{\f"Symbol" \a209 }{\up50 {\fs50 2}\dn50 }{\f"Symbol" \a102 } = {\f"Symbol" \a182 }{\up50 {\fs50 2}\dn50 }{\f"Symbol" \a102 }/{\f"Symbol" \a182 }x{\up50 {\fs50 2}\dn50 } + {\f"Symbol" \a182 }{\up50 {\fs50 2}\dn50 }{\f"Symbol" \a102 }/{\f"Symbol" \a182 }y{\up50 {\fs50 2}\dn50 } |
|
|
{\fs200 N}\sp1 \up100 \fs75 5 \rp1 \dn50 1 |
|
|
sin{\up50 {\fs50 2}\dn50 }(X) + cos{\up50 {\fs50 2}\dn50 }(X) = 1 |
|
|
104\f"Symbol" \a176 \f"Arial" 37' |
|
|
a\dn25 {\fs75 c} \n ___ \n b\dn25 {\fs75 c} |
|
|
{\f"Symbol" d}\up50 {\fs75 234}\dn50 U |
|


