Define Coordinate System
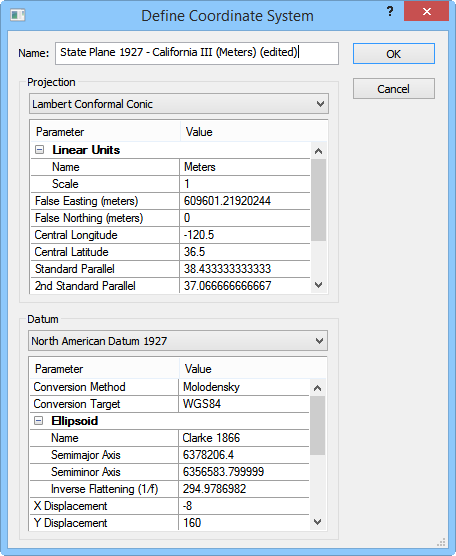
Click the New Geographic System or Modify buttons in the Assign Coordinate System dialog to open the Define Coordinate System dialog. The Define Coordinate System dialog allows you to create a Custom coordinate system. Select a Projection, enter the projection Parameters, and specify a Datum. Click OK and the new coordinate system will be added to the Assign Coordinate System dialog Custom list for future use.

|
|
Define a custom coordinate system in the Define Coordinate System dialog. |
Name
Specify a custom name for the new coordinate system in the Name box. When editing a predefined coordinate system, the name is automatically appended with (edited) after the existing name.
Projection
Select a projection from the Projection list. Specify custom Parameter and Value options. Unprojected Lat/Long does not have Parameter and Value options to specify.
The projection options include: Unprojected Lat/Long, Albers Equal Area Conic, Azimuthal Equidistant, Bonne, Cassini, Eckert IV, Eckert VI, Equidistant Conic, Equidistant Cylindrical, Gnomonic, Hotine Oblique Mercator, Lambert Azimuthal Equal Area, Lambert Conformal Conic, Mercator, Miller Cylindrical, Mollweide, Oblique Mercator, Orthographic, Polyconic, Robinson, Robinson-Sterling, Sinusoidal, Stereographic, Transverse Mercator, Universal Transverse Mercator (UTM), and Van Der Grinten.
Datum
Select a datum from the Datum list. Specify custom Parameter and Value options to fit your needs.
OK or Cancel
Click OK to create your new custom coordinate system. The coordinate system will be listed in the Custom section of the Assign Coordinate System dialog for this file. If you want to save the custom coordinate system for future use, add the custom coordinate system to the Favorites section. Click Cancel to return to the Assign Coordinate System dialog without creating a custom coordinate system.
Example 1: Defining a Custom Coordinate System
-
In the Assign Coordinate System dialog, click the New Geographic System button to open the Define Coordinate System dialog.
-
Change the Name to Lambert Conformal Conic Custom.
-
From the Projection list, select Lambert Conformal Conic.
-
Make any necessary changes to the Parameter or Values.
-
Make any necessary changes to the Datum section.
-
Click OK and the Lambert Conformal Conic Custom projection is added to the Custom section.
-
In the Assign Coordinate System dialog, select the custom projection and click OK.
Example 2: Saving a Custom Coordinate System
-
In the Assign Coordinate System dialog, click the
 button to the left of Custom.
 -
Select the coordinate system in the Custom section and click the Add to Favorites button.
-
Click the
 button to the left of Favorites to open the Favorites section. The custom projection is saved here.
 -
Click OK to close the dialog.
See Also
Map Coordinate System Overview
Introduction to Map Projections
Assign Coordinate System Dialog
Assign Coordinate System - Worksheet
Assign Coordinate System - Grid
Source Coordinate System - Map Layer