Assign Coordinate System
The Assign Coordinate System dialog is accessed from several locations. Often it is opened by clicking the Set button in the layer Coordinate System Properties page or the Change button in the map Coordinate System Properties page. It links a file, map layer, or map to a specific coordinate system. Once a coordinate system is defined for a file, a Golden Software Georeference .GSR2 file is created. This file contains all the relevant coordinate system information that Surfer needs to load the file in the proper coordinate system in the future.
When a .GSR2 file is created for a data file, it is read when creating grids or maps from the data file. The resulting grid or map layer has the same coordinate system as the original data file. The projection information can be saved with the grid file using the Spatial References options. It is recommended to check the GS Reference (Version 2) file if you intend to use the grid file in Surfer, as the GSR2 retains all of the information needed.
Assign Coordinate System Dialog
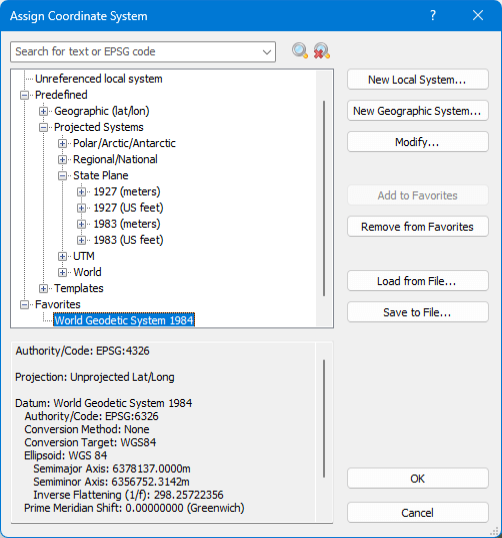
Assign a coordinate system to a map, layer, or file in the Assign Coordinate System dialog. When a coordinate system is selected, its properties are displayed. The Authority/code field shows the unique identifier and the governing body (such as EPSG) associated with the selected coordinate system to ensure precise identification. Projection displays the specific map projection algorithm applied to the coordinate system. If a geographic coordinate system is selected, this will typically read Unprojected Lat/Long.
|
|
Assign a projection to your file or map layer in the Assign Coordinate System dialog. |
Coordinate System Categories
-
Predefined: Includes thousands of standard coordinate systems categorized by type (Geographic or Projected) and region.
-
Custom: This category displays coordinate systems defined for the current session or specific to the open file.
-
Favorites: A user-defined list of frequently used coordinate systems. It is highly recommended to add any frequently used Custom systems to this list to ensure they are preserved for future sessions.
Search for Coordinate Systems
Surfer has over 2500 coordinate systems in the Assign Coordinate System dialog. To search for a specific coordinate system type a partial name, complete name, or EPSG code into the Search for text or EPSG code field. Next click the  button or press ENTER to search for the coordinate system. The number of returned search results will be displayed below the search bar. The search results will replace the full coordinate system list. Navigate through the search results by clicking the
 ![]() button to expand the categories in the Assign Coordinate System dialog. Click the
button to expand the categories in the Assign Coordinate System dialog. Click the ![]() button to clear the search results and display all of the coordinate systems in the Assign Coordinate System dialog.
button to clear the search results and display all of the coordinate systems in the Assign Coordinate System dialog.
When searching in the Assign Coordinate System dialog, the search string must exactly match a portion of the desired coordinate system name or EPSG code. However, the search string does not need to be the complete name or EPSG code. For example, searching for System 1984 will return the World Geodetic System 1984 coordinate system, but searching for World 1984 returns no results.
Projection Categories
Click the ![]() button to expand the options in the Assign Coordinate System dialog. Click the
button to expand the options in the Assign Coordinate System dialog. Click the ![]() button to collapse the options.
button to collapse the options.
Local System
Expand Local System to select the Unreferenced local system, which contains a Projection of None, a Datum of None, and a Warp of None. For example, you may have a data set with an arbitrary coordinate system (i.e. not real world X, Y coordinates). You would assign this data to a Local System , if a coordinate system is necessary.
Predefined
Expand the Predefined section by clicking the + button. The Predefined section includes all coordinate systems that have been predefined for Surfer.
Geographic (lat/lon)
Expand Geographic (lat/lon) to select a Latitude/Longitude coordinate system and datum that fits your needs. Detailed information about each projection is listed at the bottom of the dialog when the system is selected. If your data are currently in a form of lat/lon, you would want to select one of the options in Geographic (lat/lon).
Projected Systems
Expand Projected Systems to select a predefined Polar/Arctic/Antarctic, Regional/National, State Plane, UTM, or World coordinate system. Detailed information about each projection is listed to the right when the datum is selected.
Templates
Expand the Templates section to select a predefined template. Click the desired template and press the Modify button to change the properties. Once modified, the new coordinate system is added to the Custom section.
Favorites
Select a coordinate system and click the Add to Favorites button to add a coordinate system to your Favorites list. Alternatively, right-click on a selected coordinate system and choose Add to Favorites from the menu. Select a coordinate system and click the Remove from Favorites button to remove a coordinate system from your Favorites list. By default, no favorite coordinate systems are specified. It is recommended that systems that you use frequently and Custom systems that you intend to use more than once be added to the Favorites section for ease of navigation.
Custom
Expand Custom to see the custom coordinate system you have defined for the current file. Custom systems can be defined by clicking the New button. By default, no custom coordinate systems are specified. Custom coordinate systems are only listed in the dialog when the file using the custom coordinate system is open.
Golden Nugget : Custom coordinate systems are temporary. They are removed from the dialog when Surfer is closed unless they are currently assigned to a layer in the open project. To ensure a custom system is available for use in future projects, you must add it to your Favorites section by clicking the Add to Favorites button.
New Local Coordinate System
The linear units and offsets can be specified for local coordinate systems. Click the New Local System button to open the Define Unreferenced Coordinate System dialog and define a custom local unreferenced coordinate system. Alternatively, click the Modify button while Unreferenced local system is selected in the Select coordinate system list to open the Define Unreferenced Coordinate System dialog.
New Geographic Coordinate System
Click the New Geographic System button to open the Define Coordinate System dialog and define a custom projection and datum. Alternatively, right-click on an existing coordinate system and choose New Geographic System to create a new projection based off the selected projection. The new custom projection and datum will be listed in the Custom section with the name you defined.
Modify Coordinate System
Select any coordinate system from the Select a coordinate system list. Click the Modify button to open the Define Coordinate System or Define Unreferenced Coordinate System dialog. Alternatively, right-click on the coordinate system and choose Modify from the menu. Modify any properties and click OK. The modified coordinate system is added to the Custom list.
If the Modify button is unavailable, make sure that a specific coordinate system is selected. If a category of systems, such as Predefined or Geographic (lat/lon) is selected, the Modify button is unavailable.
Add to Favorites
Click the Add to Favorites button to add a projection to your Favorites list. Alternatively, right-click on a coordinate system and choose Add to Favorites. This is very useful if you frequently use the same projection, such as World Geodetic System 1984. This is also useful for Custom systems that will be used on multiple project files. Adding the projection to the Favorites list makes selecting the projection easier in the future.
If the Add to Favorites button is unavailable, make sure that a specific coordinate system is selected. If a category of systems, such as Predefined or Geographic (lat/lon) is selected, the Add to Favorites button is unavailable.
Remove from Favorites
Select a coordinate system in the Favorites list and click the Remove from Favorites button to delete the system. Alternatively, right-click on a coordinate system in the Favorites section and choose Remove. The coordinate system is removed from the Favorites section.
If the Remove from Favorites button is unavailable, make sure that a specific coordinate system is selected in the Favorites list. If a category of systems, such as Predefined or Geographic (lat/lon) is selected or if a coordinate system is selected in a category other than Favorites, the Remove from Favorites button is unavailable.
Load from File
Click Load from File to load a coordinate system from a spatial reference file with the Open dialog. The following file types are supported for import:
- Golden Software Reference .GSR2
- Golden Software Reference .GSR
- Esri Projection .PRJ
- Well Known Text .WKT
- Esri Auxiliary .AUX.XML
Save to File
Click Save to File to save a predefined or custom coordinate system to a spatial reference file with the Save As dialog. The following file types are supported for export:
- Golden Software Reference .GSR2
- Esri Projection .PRJ
- Well Known Text .WKT
- Esri Auxiliary .AUX.XML
Example 1: Select a Predefined Coordinate System (i.e. UTM)
- In the Assign Coordinate System dialog, click the
 button to the left of Predefined.
 - Click the button to the left of Projected Systems.
- Click the button to the left of UTM.
- Click the button to the left of WGS84.
- Select WGS84 UTM zone 13N.
- Click OK . The projection for this data is now set to WGS84 UTM zone 13N.
Example 2: Create and Select a Custom Coordinate System (i.e. Lambert Conformal Conic)
-
In the Assign Coordinate System dialog, click the New button to open the Define Coordinate System dialog.
-
Change the Name to Lambert Conformal Conic Custom.
-
From the Projection list, select Lambert Conformal Conic.
-
Make any necessary changes to the Parameter or Values in the Projection section.
-
Make any necessary changes to the Datum section.
-
Click OK and the Lambert Conformal Conic Custom projection is added to the Custom section.
-
Select the custom entry and click the Add to Favorites button.
-
Confirm the system now appears in the Favorites category; it is now permanently saved to your Surfer profile.
-
-
Click the custom projection and click OK to apply the projection to the data.
Example 3: Saving a Custom Coordinate System
- In the Assign Coordinate System dialog, click the button to the left of Custom.
- Select the coordinate system in the Custom section and click the Add to Favorites button.
- Click the button to the left of Favorites to open the Favorites section. The custom projection is saved here.
- Click OK to close the dialog.
See Also
Map Coordinate System Overview
Assign Coordinate System - Worksheet