Sharing Your Work
The final and arguably most important step of creating models is sharing your work with stakeholders.
Surfer offers wide variety of export file formats including image files, PDF, 3D PDF, TIFF, DXF, and SHP. This makes it easy to insert figures into presentations or other software programs based on your final deliverable requirements.
Since we already have the 3D View open, let's create a 3D PDF first.
- Click the 3D View | Output | Export 3D command.
- In the Export 3D dialog, set the Save as type to 3D PDF (Vector).
- Specify a location and name for the file, e.g. your Documents folder. The Samples folder will be displayed by default, but most users cannot save to the Samples folder.
- Click Save.
- Review the export options in the Export Options dialog, and click OK.
This 3D PDF can be easily shared with anyone. The PDF can be opened directly in Adobe Acrobat Viewer where the user can zoom, pan, and rotate the model.
You can tell Adobe to always allow playing of 3D content by following the instructions on their help page here: https://helpx.adobe.com/acrobat/using/enable-3d-content-pdf.html
If you're using your maps to generate reports and publications, you'll primarily be exporting images. Let's export an PNG of the finished map for easy inclusion in a Word document or other publication.
- Switch back to the Plot Document window by clicking the Plot1:1 tab.
- Click the File | Export command.
- Set the Save as type to PNG.
- Specify a path and file name for the PNG file.
- Click Save.
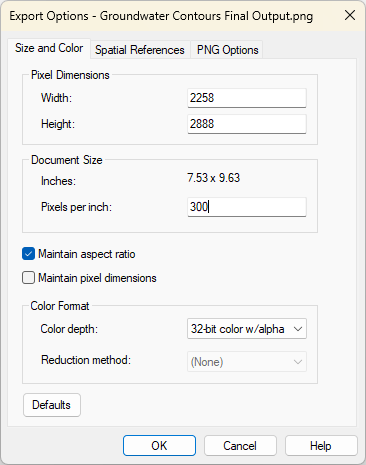
- Review the options in the Export Options dialog and click OK.
The default options generate an image file that matches the size of everything visible in the Plot Document window.
|
If you'll be using some of your Surfer data in other programs, it may be beneficial to export individual map layers to separate files. For example, you may need to save your contours as a DXF or SHP.
-
Click Contours-Well_measurements.grd in the Contents window to select it.
-
Click File | Export.
-
In the Export dialog check the box next to Selected objects only.
-
Set the Save as type to DXF AutoCAD DXF Drawing.
-
Specify a path and file name for the DXF file.
-
Click Save.
-
In the Export Options dialog, ensure that the Scaling source is set to Map and not Page Units.
-
Click the DXF Options tab.
-
Uncheck the boxes next to All lines same style and All text as areas.
-
Click OK to export only the selected map layer as your chosen file type.
With the ability to export any part of your map, you can now share the final output with clients in the format that best meets their needs.
Congratulations! You have created a finished map and exported it for presentation to your stakeholders. If you wish, save the tutorial map by clicking the File | Save command and experiment with this workflow using your own data.
Now that you're familiar with Surfer's basic functionality, let's see where you can go next....
Back to Viewing Maps in 3D