The Grid Editor | Tools | Brush command or the  button in the grid editor assigns the specified Z value in the Z value box to the grid nodes within the brush. Click the Grid Editor | Tools | Brush command to start brush mode. The cursor changes to a crosshair with a circle to visually indicate the Brush size
  . The Brush command button is highlighted in yellow to indicate brush mode as well.
Click to apply the value in the Z value box to grid nodes within the circle. Click and drag to continuously apply the Z value as the cursor moves across the grid. The grid Nodes, Labels, Color Fill, and Contours update automatically as you use the Brush command.
Press ESC or click another Grid Editor | Tools command to end Brush mode.
Tool Options
The Brush size and Z value box controls how the Brush tool changes the grid vales.
Brush Size
The Brush size tool option controls the diameter of the tool. The Brush size specifies the diameter in number of grid cells in the X direction. The Brush size setting is located in the tools options bar at the top of the grid editor window. There are three methods for changing the Brush size:
- Click in the Brush size field and type the desired Brush size.
- Click the
 buttons to increment the Brush size by one. Click and hold the buttons to quickly scroll the Brush size value up or down.
 - Press the [ key to decrease the Brush size. Press the ] key to increase the Brush size. Press and hold the [ or ] key to quickly decrease or increase the Brush size. The [ and ] keys increment the Brush size by 1 at Brush size values less than 10. The increment increases to 5 at a Brush size greater than 10 and less than 50. The increment increases to 10 at a Brush size greater than 50 and less than 100. The increment size continues to increase as the Brush size increases.
The cursor circle increases or decreases size with the Brush size setting and zoom level. The Brush size setting is saved and persistent across multiple grid editor windows.
|
|
|
|
A Brush size of 1 makes the diameter of the brush equal to the horizontal spacing of one grid cell. |
A Brush size of 3 makes the diameter of the brush equal to the horizontal spacing of three grid cells. |

Z Value Box
The Z value box in the tool options bar at the top of the grid editor window displays the Z value you wish to apply to the grid nodes. Type a new value in the Z value box and press ENTER to change the Brush Zvalue. By default the Z value box uses the grid Z value from the most recently selected grid node.
Press and hold the "i" key to temporarily change to the Eyedropper tool mode while using the Brush tool. The cursor changes to an eyedropper  . While holding the "i" key, click in the grid to quickly change the value in the Z value box to the grid Z value nearest the location you click. Release the "i" key to return to Brush mode.
Undo
Each click is registered as one operation in the Undo levels list. For example, if you set the Brush size to 1 and click once on five individual grid nodes, you must use the Undo command five times to undo all the changes. However, if you click and drag once across all five grid nodes, you must only use the Undo command once to undo all the changes.
Brush Grid Values Example
The following example will demonstrate editing the Demogrid.grd sample file with the Brush tool:
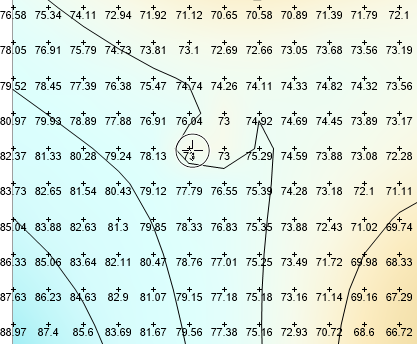
In this example, we will assume the gridding algorithm smoothed over a feature we wish to represent in the grid near node (29,6) in grid coordinates.
|
|
|
We will add a depression near the active grid node. |

- Click the Grid Editor | Tools | Brush command.
- Set the Brush size to 1 by typing 1 in the Brush size field.
- Set the Z value to 73 by typing 73 in the Z value box.
- Click near the grid node at (29,6) and drag one row down and one column left.
|
|
|
The Brush applied the Z value (73) to three grid nodes. |
We've now added the feature back to the grid. Now we wish to smooth the grid in the area we edited.
- Click the Grid Editor | Tools | Smooth command.
- Set the Brush size to 5 by typing 5 in the Brush size field.
- Click near the grid node at (29,6). The grid is smoothed within the brush region.
- Click twice more near the grid node at (29,6).
|
|
|
The edited area was then smoothed with the Smooth tool. |
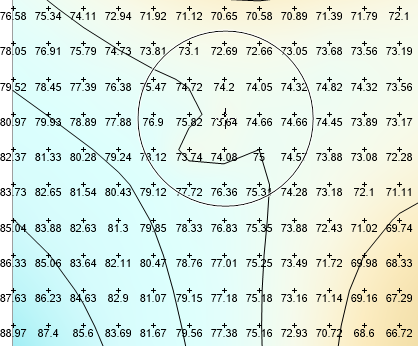
Now the depression feature has been added back to the grid and the surface has been smoothed to give a natural appearance.