Contour Map Advanced Levels Properties
The contour map properties Levels page controls the display of contours, contour labels, and color fill on the contour map. The levels can be set using a simple, logarithmic, or equal area method, which uses the same options for all major and minor contour lines. Or, an advanced option can be set that allows more control over individual contour line properties.
Display Advanced Options
To use the advanced options, click on the contour map to select it. In the Properties window, click on the Levels tab. Change the Level method to Advanced. To open the advanced Levels for Map dialog, click the Edit Levels button next to Contour levels.
The Levels page in the contour map Levels for Map dialog controls the display of contours, contour labels, color fill, and hachures on the contour map. The contour level list shows the contour levels to be displayed on the map. Contour level parameters can be set as a group or individually.
Switching Between Level Methods
When switching the Level method to Advanced, all current Simple, Logarithmic, or Equal area options are initially shown in the Levels for Map dialog. However, when switching the Level method from Advanced to Simple, Logarithmic, or Equal area it is likely that some level customizations will be lost.
Some settings require the Level method be set to Advanced. For example, if you wish to load a .LVL file, you must use the Advanced setting.
|
|
|
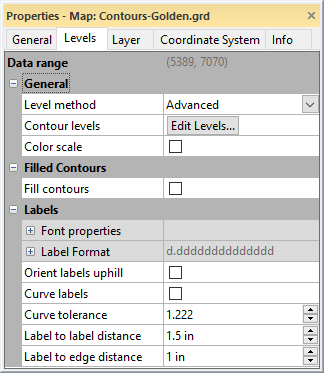
Change the Level method to Advanced to control individual contour lines. |
Levels for Map Dialog
Control advanced settings for the Level, Line, Fill, Label, and Hach properties of the contour map in the Levels for Map dialog. Properties can be adjusted for all contours at once (by clicking on the column buttons), or for individual contours (by double-clicking on the specific contour level). Click the Edit Levels button in the Contour levels field to edit the advanced levels.
|
|
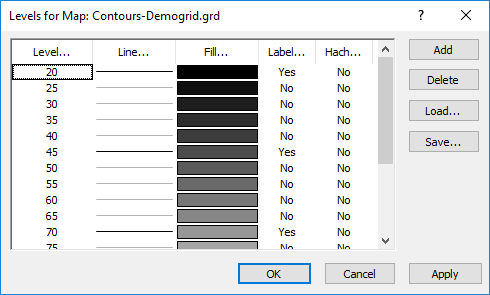
The Levels for Map dialog appears when the Level method is set to Advanced. This allows increased control for displaying the contour map levels. |
Level Parameters For All Levels
To apply level parameters to all defined levels, click the Level, Line, Fill, Label, or Hach buttons at the top of the contour level list. For example, to define the contour range and the interval between contours, click the Level button and specify these parameters in the Contour Levels dialog.
|
|
|
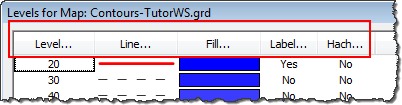
Clicking the Level, Line, Fill, Label, and Hach buttons allow you to apply parameters to multiple levels at once. |
Level Parameters For One Level
To set parameters for a specific contour level, double-click any of the elements in the list. For example, to change one contour level line's properties, double-click on the specific line to open the line properties. Make any changes and click OK. To edit one contour level's value, double-click on the individual Level to open the Z Level dialog, enter a new value, and click OK.
To change the display of an individual level label or hachure, double-click on the Yes or No value for that level. The option will change.
Load and Save
The Load and Save buttons allow you to load and save .LVL level files containing contour level settings. If you want to retain contour map settings such as contour intervals, contour labels, line color, and color fill you can save the setting in a level .LVL file. Once you have modified the settings click the Save button on the Levels page in the Levels for Map dialog. Level files can only be used with maps of similar Z ranges.
If you want to save only the color definitions, you can do this by clicking the Fill button. In the dialog that appears, click the color bar next to Foreground Color. In the Colormap Editor that appears, click the Save button to save the color definitions as a .CLR file. The .CLR file can be used with any Z range, because only the relative locations of the colors are saved.
Add and Delete
Use the Add and Delete buttons to add or delete specific contour levels.
Editing Advanced Contour Options
- Click on a contour map to select it.
- In the Properties window, click on the Levels page.
- Change the Level method to Advanced.
- To open the advanced levels dialog, click the Edit Levels button next to Contour levels.
- Click on an existing contour level value to select it.
- Click the Add button to add a contour level with a value halfway between the selected level and the next lower level. Adding levels creates irregularly spaced contours.
- Click the Delete button to remove the selected level from the list.
- To modify an existing level, double-click the level value. Enter a new value for the contour level in the Z Level dialog. Click OK and the contour level list is updated.
- When you are finished changing the contour levels, click OK and the map is displayed with your changes.
- To add color to the contours, check the box next to Fill contours in the Properties window on the Levels page.