Attribute Table
The Attribute Table contains all the attributes for all the objects in a base layer. Use the attribute table to add, rename, or remove the attributes, or metadata, associated with the objects in a base map. The attribute table can also be used to edit attribute values for multiple objects without selecting the objects in the Properties window.
Opening the Attribute Table
A base layer or one of the objects in a base layer must be selected to open the attribute table.
To open the attribute table, click the Map Tools | Layer Tools | Open Attribute Table command or the  button. Alternatively, right-click the base layer, or one of its child objects, and click Open Attribute Table in the context menu. When one of the objects in a base layer is selected before opening the attribute table, the attribute table is opened with the selected object highlighted.
The attribute table can be kept open as long as desired. It is unnecessary to close the attribute table to continue using Surfer. An attribute table can be open for each base layer in the document, but only one attribute table can be open for a each base layer.
Automatic Updating
Changes made in the attribute table are immediately displayed in the Properties window Info page. Changing the attribute value in the Info page automatically updates the attribute table. Changes and selections made in the Contents window are immediately displayed in the attribute table. Adding or deleting objects in the Contents window or plot window is reflected in the attribute table.
However, adding, renaming, and deleting attributes in the Info page is not reflected in the attribute table. Close and reopen the attribute table to see the changes made to attribute fields in the Info page.
Attribute and Object Order
The attribute table includes each object in the base layer and the attributes for each object. The objects are listed by row in the same order as in the Contents window. As mentioned above, changing the object order in the Contents window will automatically update the object order in the attribute table. Click on the column header once to sort the column in ascending order and twice in descending order.
Selected Object Indication
When an object is selected in the Contents window or plot window, the active object is highlighted by a sky blue background in the attribute table. When a cell is clicked in the attribute table, the associated object is selected in the window and plot window.
Undo and Redo
Click the Home | Undo | Undo command,  button, or press CTRL+Z to undo the last action in the attribute table. Click the command,
  button, or press CTRL+Y to redo the last action in the attribute table.
Selecting Cells
Select a single cell by clicking once on the cell. Select multiple cells by clicking and dragging from one cell to another. Select non-adjacent cells by holding CTRL and clicking once on the cell. The selected cells are indicated with a blue background and white text.
Attribute Table Dialog
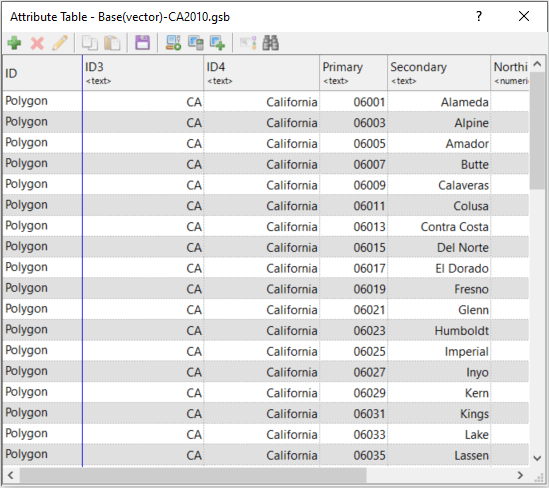
The attribute table consists of object rows, the Id column, and attribute fields. For each object and attribute, a cell displays the attribute value for the object.
|
|
|
Edit or add attributes and attribute values for each object in the Attribute Table dialog. |
Add Attribute Field
Click the ![]() button in the top left section of the dialog to add a new attribute field. The attribute field is also added to the Info page for all objects in the base layer. Clicking the button opens the New Attribute Name dialog. Type the new attribute name in the Attribute name field and click OK. A new attribute field can also be added by right-clicking on any node and selecting Add Field from the context menu.
button in the top left section of the dialog to add a new attribute field. The attribute field is also added to the Info page for all objects in the base layer. Clicking the button opens the New Attribute Name dialog. Type the new attribute name in the Attribute name field and click OK. A new attribute field can also be added by right-clicking on any node and selecting Add Field from the context menu.
Delete Attribute Field
Click the attribute field title or any node within the field, then click the ![]() button in the top left section of the dialog to delete the attribute field. The attribute field is also removed from the Info page for all objects in the base layer. Alternatively, delete an attribute field by right-clicking any node within the field and selecting from the context menu.
button in the top left section of the dialog to delete the attribute field. The attribute field is also removed from the Info page for all objects in the base layer. Alternatively, delete an attribute field by right-clicking any node within the field and selecting from the context menu.
Rename Attribute Field
Click the attribute field title or any node within the field, then click the  button in the top left section of the dialog to rename the attribute field. Clicking the button opens the New Attribute Name dialog. Type the new attribute name in the field and click OK. The attribute field is also renamed in the Info page for all objects in the base layer. Alternatively, rename an attribute field by right-clicking any node within the field and selecting Rename field from the context menu.
Copying and Pasting in the Attribute Table
Attribute values can be copied from the attribute table and pasted into Surfer or another program. Copy the selected cells by pressing CTRL+C. The Home | Clipboard | Copy command copies the selected object(s) in the plot window. The must be selected and the keyboard command must be used to copy values in the attribute table.
Text can be pasted into a single cell by clicking the  button or pressing CTRL+V. The Home | Clipboard | Paste command pastes the clipboard contents in the plot window, not the attribute table.
Click the  button or press CTRL+S to save the attributes to a data file in the Save As dialog.
Add Geometry Attributes
Click the  button to add geometry attributes to the attribute table. Select the units and which geometry attributes are added to the attribute table in the Add Geometry Attributes dialog.
Calculate Attributes
Click the  button to modify an existing attribute or create a new attribute with mathematical functions and existing attribute values in the Calculate Attributes dialog.
Join Attributes
Click the  button to add attributes to the existing attribute table. As long as a single attribute is in common between the existing layer of attributes and the new file, Surfer will import all the columns from the new file. Select the file to import and attributes from the file in the Join Attributes dialog.
Query Objects
Click the  button to Query Objects to select, deselect, move, copy, or exports objects
that satisfy a user-defined query. Queries are performed on the objects
in a single base layer.
button to Query Objects to select, deselect, move, copy, or exports objects
that satisfy a user-defined query. Queries are performed on the objects
in a single base layer.
Find and Replace
Click the  button to find and replace text in the attribute table. The attribute table version of the Find and Replace dialog is displayed.
Id Column
The Id field displays the object name. The object name is edited with the Rename Object command. When an object is renamed, the object name is updated in the Id column of the attribute table. When objects are rearranged in the Contents window, the object order is updated in the attribute table. Object names cannot be edited in the attribute table.
Attribute Fields
Click once on a cell and type a value to change the attribute value for the object. Press ENTER to update the attribute value. Press one of the ARROW keys to update the attribute value and move the active cell selection to another cell.
Double-click on a cell to enter cell edit mode. While in cell edit mode the ARROW keys move the insertion point. The insertion point is where the next characters from the keyboard will appear. Type the desired value and press ENTER to change the attribute value. While in cell edit mode, you can paste text into the cell by pressing CTRL+V.
ZLEVEL
Surfer automatically links ZLEVEL attribute values and the Z coordinate values for Point features. Changing either the Z coordinate value or ZLEVEL attribute value for a point will automatically update the other value. If a Z coordinate is added to a point, a ZLEVEL attribute will be created for that point. However, the Z coordinate value for 3D Polyline and 3D Polygon vertices is not linked to the ZLEVEL attribute, as each vertex can have its own Z coordinate value.