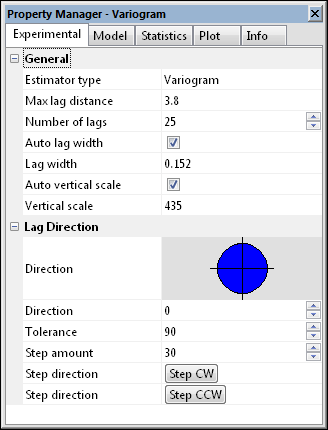
Variogram Experimental Properties
The Experimental page in the Properties window contains parameters for the experimental variogram such as the lag direction, estimator type, maximum lag distance, number of lags, lag width, and vertical scale.
|
|
|
The Experimental page in the Properties window contains the parameters for the experimental variogram. The diagram in the Lag Direction section shows the direction and size of the angular window of the current variogram. |
Estimator Type
Surfer contains four estimating options when create a variogram: the variogram, standardized variogram, autocovariance, and autocorrelation. When in doubt use the default classical variogram. When cokriging, the cross variogram, Var1-Var2, estimator is Covariance.
Maximum Lag Distance
The Max lag distance specifies the extent of the separation distance axis (abscissa or X axis). This value should never be larger than the Max Lag Distance specified in the New Variogram dialog. Pairs with separation values beyond the New Variogram Max lag distance have been eliminated from the variogram already. The Max lag distance specified when creating the variogram grid (New Variogram) limits the maximum separation distance that you can look (without recreating a new variogram grid). The Max lag distance specified in the variogram properties dialog limits the maximum separation distance you will look. The Max lag distance specified in the Experimental page in the variogram properties dialog is often less than the Max lag distance specified when creating the variogram grid. Select a value >0.
Number of Lags
The Number of lags specifies how many experimental variogram points are computed and plotted. The default Number of Lags is 25. Select a value >=1.
Lag Width/Lag Size and Auto Lag Width
When the Auto lag width box is checked, the Lag width is automatically set equal to the Max lag distance divided by the Number of lags. For example, if the Max lag distance is 100, and the Number of lags is five, the Lag width would be set to 100 / 5 = 20. In this case, the first plotted point would summarize all pairs with separation distances greater than or equal to zero and less than 20. The second plotted point would summarize all pairs with separation distances greater than or equal to 20 and less than 40, etc. Lag intervals are 0 to 20, 20 to 40, ..., 80 to 100; they do not overlap. You can use Lag Width to smooth a variogram.
Vertical Scale and Auto Vertical Scale
The Vertical scale specifies the extent of the variogram axis (ordinate or Y axis). If the Auto vertical scale box is checked, the vertical scale is determined on the fly so that the entire variogram fits on the plot. When the Auto vertical scale box is checked the vertical scale is recomputed every time the variogram is redrawn. As you step around with the Step CCW or Step CW buttons, the vertical scale changes with each step.
When the Auto vertical scale box is not checked, the Vertical scale is held constant at the specified value. When using the Step CCW and Step CW buttons to rotate the lag direction, it is advisable to uncheck the Auto vertical scale box to avoid having the vertical scale change for every plot. This allows for easier visual comparison between plots.
Lag Direction
The Lag Direction section controls the direction from which the variogram is viewed.
Direction
The Direction specifies the focal direction when computing the experimental variogram. In keeping with the standard notation used in geostatistics, this direction is given using a mathematical convention: 0° is along the positive X axis, and 90° is along the positive Y axis. The direction is not given as an azimuth.
Tolerance
The direction Tolerance specifies the size of the angular window for the experimental variogram. The angular window is:
Direction - Tolerance < Angle < Direction + Tolerance
thus, the width of the entire angular window is twice the Tolerance. Select a Tolerance value between 0 and 90.
For example, the default Tolerance of 90° captures all directions (omni-directional variogram). The diagrammatic representation of the current angular window appears in theLag Directiongroup.
Step Amount and Step Direction
When building a complete model of a variogram, it is necessary to review the variogram and the model in many directions. Surfer allows you to step through as many directions as desired in an animated fashion. Since Surfer uses a variogram grid approach it can compute and replot directional variograms almost instantaneously. The Step amount specifies the increment in the lag Direction each time the Step or Step buttons are clicked. When the Step CW button is clicked, the lag Direction is decremented by the Step amount and the variogram plot is automatically updated. When the Step CCW button is clicked, the lag Direction is incremented by the Step amount and the variogram plot is automatically updated.
