Axis Scaling Properties
Axis scaling controls the axis limits, the major tick starting and ending values, and the position of the axis relative to the other axes in the map. To set axis scaling, click on the axis to select it. Click on the Scaling page in the Properties window.
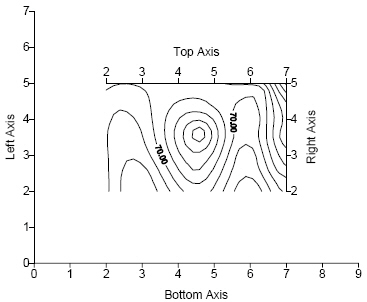
Axis scaling is different from setting the map scale. When axis scaling is set, the axis limits are defined but does not rescale the map. Axes that use different limits than the map are still drawn at the same scale as the map. Because of this, it is possible to have axes shorter or longer than the map. To change the map scale, click on the Map object and click the Scale tab in the Properties window.
|
|
|
In this example, the Bottom Axis and Left Axis are offset from the map, and the limits of the axes are set differently than the map limits. |
Scaling Page
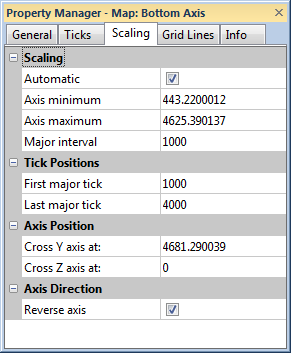
The Scaling page for an axis in the Properties window controls the axis scaling properties.
|
|
|
Specify the axis scaling in the Properties window on the Scaling page. |
Automatic Scaling
The Automatic check box uses the limits of the map as the limits for the axes and uses a reasonable tick mark spacing along the axis. When any parameters are changed on the axis properties Scaling page, the Automatic check box is automatically unchecked. After making any changes, you can return to the automatic settings by checking the Automatic box.
Axis Minimum
The Axis minimum box specifies the minimum axis value. To change the minimum value, highlight the existing value and type a new value. Press ENTER on the keyboard to make the change.
When using date/time formats for the axis labels, enter the minimum date/time axis value. For instance, 02/02/2014 12:00:00 AM can be entered into the Axis minimum option.
Axis Maximum
The Axis maximum box specifies the maximum axis value. To change the maximum value, highlight the existing value and type a new value. Press ENTER on the keyboard to make the change.
When using date/time formats for the axis labels, enter the maximum date/time axis value. For instance, 10/31/2014 12:00:00 AM can be entered into the Axis maximum option.
Major Interval
The Major interval box contains the value of the spacing, in data units, between major ticks along the selected axis. The major tick marks occur at values
Tick = First major tick + n* Major interval n =0, 1, ..., N
where N is the largest integer such that Tick £ Last major tick. Thus, a tick mark is placed at the value of the Last major tick only if the interval (Last major tick - First major tick) is evenly divisible by Major interval. To change the interval, highlight the existing value and type a new value. Press ENTER on the keyboard to make the change.
When using the date/time formats for the axis labels, click on the existing time scale (Years, Weeks, Days, Hours, Minutes, or Seconds) and select the desired time scale to select how often the labels are drawn. Then, highlight the existing value and type a new value to set how many of the desired time scales should occur before the next tick. Alternatively, click the ![]() to increase or decrease the value. For instance, setting the Major interval to 3 Years displays a tick at the First major tick location. The second tick will occur 3 years after the first.
to increase or decrease the value. For instance, setting the Major interval to 3 Years displays a tick at the First major tick location. The second tick will occur 3 years after the first.
|
|
|
When date/time axis labels are displayed, the Major interval is set in date/time units. |
First Major Tick
The First major tick box contains the major tick mark minimum value. This value is expressed in data units. The First major tick does not need to be the same as the Axis minimum but it cannot be less than the Axis minimum. To change the First major tick value, highlight the existing value and type a new value. Press ENTER on the keyboard to make the change.
When using date/time formats for the axis labels, enter the first major date/time axis tick mark value. For instance, 02/02/2014 12:00:00 AM can be entered into the First major tick option.
Last Major Tick
The Last major tick box contains the maximum allowed major tick mark value. This value is expressed in data units. The Last major tick does not need to be the same as the Axis maximum but it cannot be greater than the Axis maximum. To change the Last major tick value, highlight the existing value and type a new value. Press ENTER on the keyboard to make the change.
When using date/time formats for the axis labels, enter the last major date/time axis tick mark value. For instance, 10/31/2014 12:00:00 AM can be entered into the Last major tick option.
Axis Position
Axes are a part of the map on which they are placed. By default, axes are drawn at the edge of a map or surface. Map axes are placed in relation to the other axes on the map.
A contour map has two Y axes: the Left Axis and Right Axis. The placement of the Y axes are relative to the data units along the X axes (the Top Axis and Bottom Axis) on the map. By default, the left Y axis crosses the X axes at the minimum X axis value.
Cross Y Axis At
The Cross Y axis at box is only displayed when an X or Z axis is selected. This specifies the position of the X or Z axis along the Y axis. The value is entered in Y data units. To change the value, highlight the existing value and type a new value. Press ENTER on the keyboard to make the change.
When using date/time formats for the axis labels, the Cross X axis at, Cross Y axis at, and Cross Z axis at must always be in numbers, not in date/time format.
Cross Z Axis At
The Cross Z axis at box specifies the position of the X or Y axis relative to the Z axis on a 3D wireframe or surface map. The value is entered in Z data units. To change the value, highlight the existing value and type a new value. Press ENTER on the keyboard to make the change. By default, the X and Y axes are drawn at the elevation of the base defined for the wireframe or surface map. For example, if the base for the wireframe is set to be 25, the X and Y axes cross the Z axis at an elevation of 25.
When using date/time formats for the axis labels, the Cross X axis at, Cross Y axis at, and Cross Z axis at must always be in numbers, not in date/time format.
Cross X Axis At
The Cross X axis at box is only displayed when an Y or Z axis is selected. This specifies the position of the Y or Z axis along the X axis. The value is entered in X data units. To change the value, highlight the existing value and type a new value. Press ENTER on the keyboard to make the change.
When using date/time formats for the axis labels, the Cross X axis at, Cross Y axis at, and Cross Z axis at must always be in numbers, not in date/time format.
Axis Direction
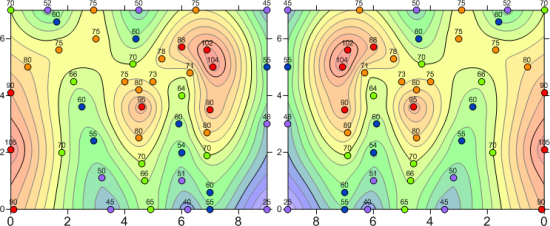
To make an axis descending, check the box next to Reverse axis. Map layers are automatically updated when the axis is reversed. When the axis is normal (the Reverse axis box is unchecked), the axis minimum value is on the left side for an X axis and on the bottom for a Y axis. When reversed, the axis minimum is located on the right side for an X axis and the top for a Y axis. When one X axis is reversed (i.e. Bottom Axis), all X axes on the map are automatically reversed. When one Y axis is reversed (i.e. Right Axis), all Y axes on the map are automatically reversed.
Z axes and variogram axes cannot be reversed.
|
|
|
The two maps both display contours and classed post data from the same files. The map on the right has the Reverse axis option checked for the Bottom Axis . All map properties are reversed. |
Setting the Axis Scale
Axis limits are specified in map coordinates, profile, or variogram units. Axis limits do not need to coincide with the map limits. Use these steps to change the axis scale:
Click on an axis to select it. The Properties window automatically shows the properties for the axis.
Click on the Scaling tab.
You can set any of the parameters listed below.
The Automatic box uses the limits of the map as the limits for the axes and uses a reasonable tick mark spacing along the axis. When any parameters are changed in the axis properties, the Automatic box is automatically unchecked. After making any changes, you can return to the automatic settings by checking the Automatic box.
The Axis minimum box specifies the minimum axis limit.
The Axis maximum box specifies the maximum axis limit.
The axis is automatically updated with the new axis scale settings as the values are changed.


