Tutorial
The Surfer tutorial will introduce you to the software by walking you through the creation of the groundwater contour map illustrated below.
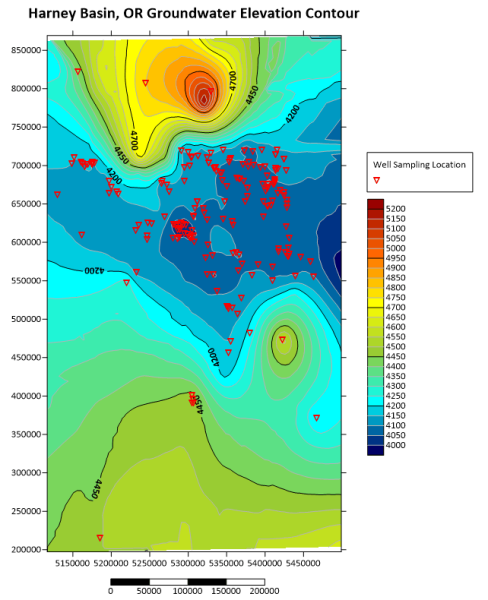
|
| Final groundwater contour map created using the Surfer tutorial |
To get the most out of your Surfer experience, we highly recommend completing the entire tutorial which should take about an hour. After you have completed the tutorial, you will have all the tools needed to create maps in Surfer using your own data.
The last page of the tutorial contains resources to continue your journey and learn more about Surfer's advanced features.
Tutorial Overview
The tutorial will cover the following topics:
|
Open Surfer, create a new plot window, and learn about the user interface |
|
|
Import data into Surfer and learn how to format it for best performance |
|
|
Create a grid file and contour map from irregularly spaced well data |
|
|
Adjust the appearance of the contour map |
|
|
Add map layers, a legend, and a map scale bar to the contour map |
|
|
Adjust the map coordinates so that all map units are in feet |
|
|
View the map in the 3D view and show 3D vector points |
|
|
Export the map in various file formats and save the project |
|
|
Learn about additional Surfer features that may be helpful in your work |
Reading the Documentation
Various font styles are used throughout the Surfer quick start guide and online help.
-
Bold text indicates commands, dialog names, tab names, window names, and page names.
-
Italic text indicates items within a dialog or window such as section names, options, field names, and buttons. For example, the Save As dialog contains a Save as type field.
-
Commands appear as Home | New Map | Contour. This means, "click or scroll to the Home tab at the top of the application window, then click on the Contour command within the New Map command group." The first word is always the menu or ribbon tab name, followed by the command group, and finally the command name within the menu list or on the ribbon.
Sample File Location
The sample files used in the tutorial lessons are located in the Surfer Samples folder. The Samples folder is located by default at C:\Program Files\Golden Software\Surfer\Samples.
Topic Links
Click the
Next to Getting Started