Contents
The Contents window contains a hierarchical list of all objects in the plot, grid editor, or 3D view window. The objects can be selected, arranged, moved, renamed, or deleted in the Contents window. Changes made in the Contents window are reflected in the plot, grid editor, or 3D view window and vice versa.
|
|
|
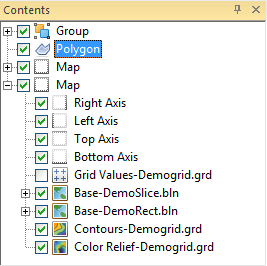
The Contents window displays the structure of all the objects in the plot window. |
Displaying or Hiding the Contents Window
The Contents window is opened and closed with the View | Show/Hide | Contents command. Clear the Contents check box to hide the Contents window. Check the Contents check box to display the Contents window. Alternatively, you can click on the ![]() button in the title bar of the Contents window to close the window. You can also right-click on the Contents window title bar and click Hide. To activate the Contents window, click inside the Contents window or press ALT+F11 on the keyboard.
button in the title bar of the Contents window to close the window. You can also right-click on the Contents window title bar and click Hide. To activate the Contents window, click inside the Contents window or press ALT+F11 on the keyboard.
Auto Hide the Contents Window
You can increase the plot document space by minimizing the Contents window with the Auto Hide feature. To hide the manager, click on the ![]() button in the upper right corner of the Contents window. The window hides on the left, top, or right side of the plot window as a small tab labeled Contents.
button in the upper right corner of the Contents window. The window hides on the left, top, or right side of the plot window as a small tab labeled Contents.
To view the contents of the Contents window while in tab view, place the cursor directly over the tab. Click in the window to keep it open for use. Click outside the window to return it to the hidden position. Click on the ![]() button to return it to the normal display mode. Alternatively, right-click the Contents window title bar and select Auto Hide. You can also drag the sides the Contents window to change the size of the window.
button to return it to the normal display mode. Alternatively, right-click the Contents window title bar and select Auto Hide. You can also drag the sides the Contents window to change the size of the window.
Changing the Contents Window Location - Floating vs. Docking
The Contents window can be docked on the edge of the Surfer window or floated as a dialog. The Contents window is displayed in a docked view by default. The manager can also be detached to display as a floating window. Double-click on the Contents window title bar to toggle between floating and docked modes. Alternatively, right-click the Contents window title bar and select Floating, Docking, Auto Hide, or Hide.
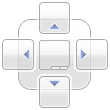
To change the position of the docked Contents window, left-click the title bar of the manager and drag it to a new location while holding the left mouse button. The docking mechanism displays with arrow indicators as you move the window. When the cursor touches one of the docking indicators in the docking mechanism, a blue rectangle shows the window docking position. Release the left mouse button to allow the manager to be docked in the specified location.
|
|
|
The docking mechanism displays with docking indicators. |
Object Tree
If an object contains sub-objects, a  or
or  is located to the left
of the object name. Click on the
or button to expand or collapse the list. For example,
a map object normally contains at least one map layer (e.g. Contours)
and four axes. The Map object
may contain many other objects. To expand the Map
tree, click on the control. You can also select the
item, and press the PLUS key on the numeric keypad or press the RIGHT
ARROW key on your keyboard. To collapse a branch of the tree, click on
the control. You can also select the item, and press
the MINUS key on the numeric keypad or press the LEFT ARROW key. The expansion
state of sub-objects in the Contents
window is retained in the Surfer
file .SRF. Use the Expand new Contents
window items option in the Options
dialog to control the expansion state of new objects in Contents
window.
is located to the left
of the object name. Click on the
or button to expand or collapse the list. For example,
a map object normally contains at least one map layer (e.g. Contours)
and four axes. The Map object
may contain many other objects. To expand the Map
tree, click on the control. You can also select the
item, and press the PLUS key on the numeric keypad or press the RIGHT
ARROW key on your keyboard. To collapse a branch of the tree, click on
the control. You can also select the item, and press
the MINUS key on the numeric keypad or press the LEFT ARROW key. The expansion
state of sub-objects in the Contents
window is retained in the Surfer
file .SRF. Use the Expand new Contents
window items option in the Options
dialog to control the expansion state of new objects in Contents
window.
|
|
|
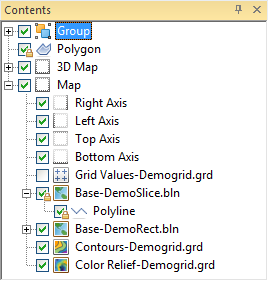
The + sign to left of the Group indicates it is collapsed. The - sign to the left of the Map indicates it is expanded. |
Selecting Objects
To select an item in the Contents window, click on the item or press the arrow keys, and the object text is highlighted. The selection handles in the plot change to indicate the selected item. If you select an object in the plot window, its name is selected in the Contents window as well. More than one nested object can be selected at a time.
To select multiple objects at the same level in the tree, hold down the CTRL key and click on each object. To select multiple contiguous objects at the same level in the tree, select the first object, and then hold down the SHIFT key and click on the last object.
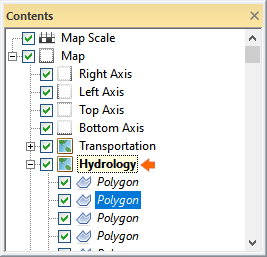
Click on a base layer or a group in the Contents window and an orange left-hand arrow with a small pushpin appears. Clicking on the pin either pins  or unpins
  the layer or group for editing. When a layer or group is pinned, only objects within the pinned layer or group can be selected. This feature is useful for selecting objects in the plot window.
|
|
|
|
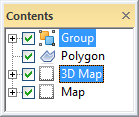
The Group and 3D Map objects were clicked while holding CTRL. |
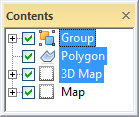
The Group and 3D Map objects were clicked while holding SHIFT. |
Unknown Coordinate System Icon
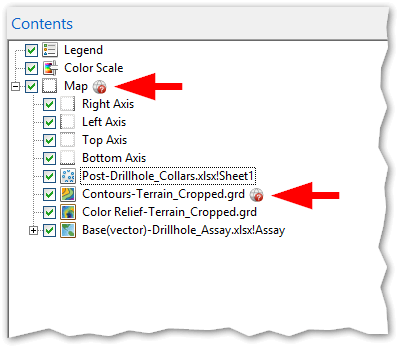
When a map contains a mix of referenced and unreferenced data, an unknown coordinate system icon (a small globe with a question mark, ![]() ) appears in the Contents window next to any map or layer that does not have a coordinate system assigned. This icon appears to the right of the object name, just before the lock (pin) icon.
) appears in the Contents window next to any map or layer that does not have a coordinate system assigned. This icon appears to the right of the object name, just before the lock (pin) icon.
|
|
|
The red arrows are pointing to the right of objects that do not have a coordinate system assigned. |
Assigning a Coordinate System
You can quickly resolve the missing coordinate system directly from the Contents window:
-
Click or double-click the globe icon.
-
Surfer will automatically select the object, activate the Coordinate System properties page, and open the Assign Coordinate System dialog. (Note: If you have the Add Comment tool active, it will be exited).
-
Select the appropriate coordinate system and click OK.
-
The icon is instantly removed from the Contents window, and Surfer will issue a warning if there are any remaining unreferenced layers, invalid geotransforms, or manually scaled axes.
Golden Nugget : Clicking the icon while holding the CTRL or SHIFT key will do nothing. This is an intentional design to prevent the dialog from accidentally opening while you are trying to multi-select several layers!
When unknown coordinate system icon is hidden
To prevent visual clutter, the unknown coordinate system icon is not displayed under the following conditions:
-
The map or layer already has a coordinate system assigned.
-
The map and all of its layers are completely unreferenced (i.e., there is no mix of referenced and unreferenced data in the map).
-
The map contains a 3D Surface or Wireframe layer.
-
The layer is a Graticule (because graticules automatically use the map's coordinate system).
Arranging Objects
To change the display order of the objects with the mouse, select an object and drag it to a new position in the list above or below an object at the same level in the tree. The pointer changes to a black arrow if the object can be moved to the cursor location, or a red circle with a diagonal line if the object cannot be moved to the indicated location. Alternatively, select an object and use the To Front, To Back, Forward, and Backward commands. These commands can be accessed in the Layout | Move command group or by right-clicking on an object in the Contents window.
Moving Features
Features such as points, polylines, and polygons can be moved between base (vector) layers and the plot document. The Home | Clipboard | Move/Copy to Layer command can be used to move or copy features. Features can also be moved in the Contents window. To move a feature to another base (vector) layer, select the feature and drag it to a new position within another base (vector) layer. To move a feature to the plot document, select the feature and drag it to a new position above, between, or below the top-level objects in the Contents window.
Editing Features in Groups
Features such as points, polylines, and polygons can be added, edited, and removed from composite objects such as groups and base (vector) layers. A special edit mode is enabled to do so. Edit mode is started and stopped automatically by the application. Ensure that edit mode is not enabled before using the Export command either by clearing the selection or selecting a non-composite object.
|
|
|
An orange arrow and italic text indicates edit mode is enabled. |
Object Visibility
Each object in the Contents
window includes an icon indicating the type of object and a text label
for the object. All objects also have a check box that indicates if the
object is visible. A  indicates the object is visible.
A
indicates the object is visible.
A ![]() indicates the object is not visible. Click on the
check box to change the visibility state of the object. Invisible objects
do not appear in the plot window and do not appear on printed output.
The visibility check box also controls the visibility for all of its sub-objects.
For example, if a Map object
is made invisible then the axes and layers within the Map
will also be hidden. Note that if a surface is made invisible,
any overlays also become invisible. Select multiple objects to toggle the visibility for multiple objects at one time.
indicates the object is not visible. Click on the
check box to change the visibility state of the object. Invisible objects
do not appear in the plot window and do not appear on printed output.
The visibility check box also controls the visibility for all of its sub-objects.
For example, if a Map object
is made invisible then the axes and layers within the Map
will also be hidden. Note that if a surface is made invisible,
any overlays also become invisible. Select multiple objects to toggle the visibility for multiple objects at one time.
|
|
|
A check mark indicates the object is visible. In this example, the grid values layer is not visible. |
Locked Objects
Objects and layers can be locked to prevent changes to their size and position with the Layout | Position | Lock command. When an object or layer is locked, a small lock icon appears in the lower-right corner of the visibility check box. When a map, group, or base layer object is locked, all of its sub-objects are automatically locked.
|
|
|
The lock icon indicates the object is locked. In this example a polygon and base map layer are locked. |
Opening Object Properties
To display the properties for an object, click once on the object in the Contents window or in the plot window. The properties are displayed in the Properties window. To display a context menu of available actions for an object, right-click on that object. When the Properties window is hidden or closed, double-clicking on an object in the Contents window opens the Properties window with the properties for the selected object displayed. The map properties control the map's View, Scale, Limits, Frame, and Coordinate System. Each map layer has specific properties that controls the options for the specific map type. Each map axis also has properties.
Renaming Objects
To edit an object’s text ID, select the object in the Contents window and then click again on the selected item (two slow clicks) to edit the text ID associated with an object. Allow enough time between the two clicks so it is not interpreted as a double-click. Enter the new name into the box. Alternatively, right-click on an object name and select Rename Object, select the object and click the Rename command, or select the object and press F2 on the keyboard. Enter an ID in the Rename Object dialog and click OK.
Deleting Objects
To delete an object, select the object and press the DELETE key. To move a map layer from one map to a new map, click on the map layer and click the Map Tools | Layer Tools | Break Apart command. Or right-click on the map layer and select Break Apart Layer. Select multiple objects and press DELETE to delete multiple objects at one time.
Scroll the Contents Window
If the list of objects in the Contents window is long, you can use the scroll bar on the side of the Contents window to scroll down to an object. Alternatively, you can use the mouse scroll wheel to scroll down. To scroll down using the mouse, click once in the Contents window to select the window. Roll the mouse wheel backward to scroll lower in the Contents window. Roll the mouse wheel forward to scroll higher in the Contents window.